Wednesday, July 31, 2019

GET YOUR MONGOL ON: FIREFORGE TSUBODAI AND CAMEL DRUMMER

My Newest Addition: Fireforge Mongol Camel Drummer and Tsubodai

And now, for something completely different...SAGA fever has caught on in my gaming circle.  Originally, I was simply a mildly interested bystander to these SAGA goings on.  Upon further investigation, though, I realized that the low SAGA figure count meant that I had among my Smalle Warre Tartar contingent more than enough figs to represent a 6 point Mongol Saga Warband. So, with no investment in new figures or painting time, it was an easy leap to give SAGA a try--and with the dreaded Mongols, no less. Given that our club will be having a SAGA Game Day in October, I decided that I should upgrade my Mongol specialty figures, namely the Warlord and Mongol Camel Drummer.  Hence this post.  After casting about for options, I settled  on Fireforge figures.    
 Heavy Metal: Fender Washers for Heft

Now, Fireforge figures are plastics, and I'm a metal figure guy.  I decided to put this preference aside, though, given that this was only going to be two figures and they were so dynamic compared to other options.  To compensate for their lack of heft, however, I put a fender washer on each base. This trick has worked out well, and the figures have a nice, substantial feel to them about the same as if they were metals.  I have to say, though, that the overall experience of working with these two plastics/resin figures has not made me a convert.  My next SAGA project will be to upgrade my Mongol Hearthguard heavy cavalry, and I'm going to do those with metals.  I don't intend to knock Fireforge figures with this observation--metals have their own challenges, to be sure.  It's just that after all these years, I'm just wired for dealing with metals (just like I'm still using Enamel paints: they go together in that way).  But enough of that.  In this post, dear readers, I present a study of how I did these figures.  For those with an interest in the nitty gritty, you'll find an itemized account of the paints and processes at the end of this post.  But now, on to the eye candy.  As usual, you may clix pix for BIG PIX.


MONGOL CAMEL DRUMMER
Although I used the Fireforge model as an example, I did other research and reinterpreted the figure in my own way. To keep him from looking like he was wearing a giant pancake on his head, I painted the fur lining of the Mongol cap, even though this detail is not in the sculpt.  This was also my first attempt at rendering chain mail: I'm tempted to try a few other medievals based on the result. Here are a few more angles:
To seat the rider, I found that I had to bend the scabbard to the point where it cracked in order to get it around the two bags to the rider's left rear.

TSUBODAI
I reinterpreted this figure as well compared to the Fireforge example. The major difference was in the horse armor. Based on examples of colorful Mongol horse armor, I decided to jazz it up and do it in alternating metallics (bands of brass/gold and steel). I also did the shoulder scales as armored as opposed to what appears to be leather in the Fireforge example. A few other color choices are different, but those are mainly superficial. The horse took slightly longer to do than the rider (a first). Here are few more viewing angles to complete the study:
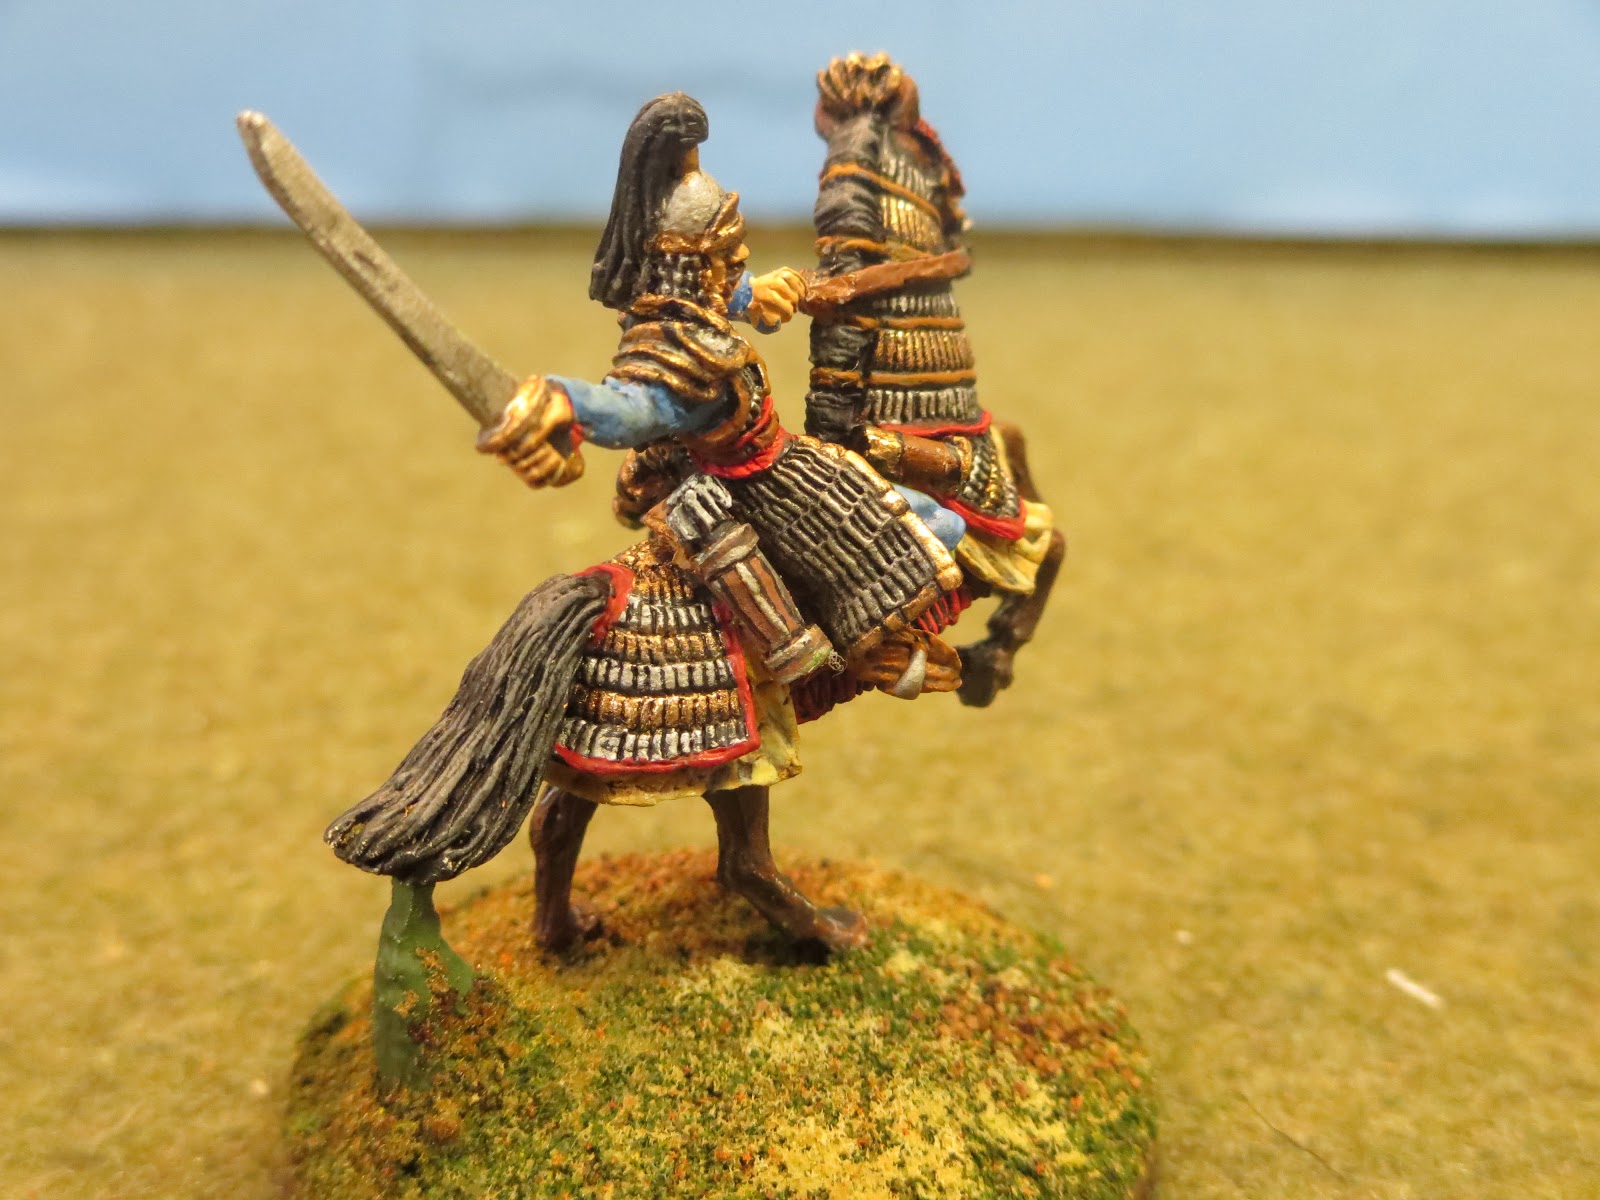
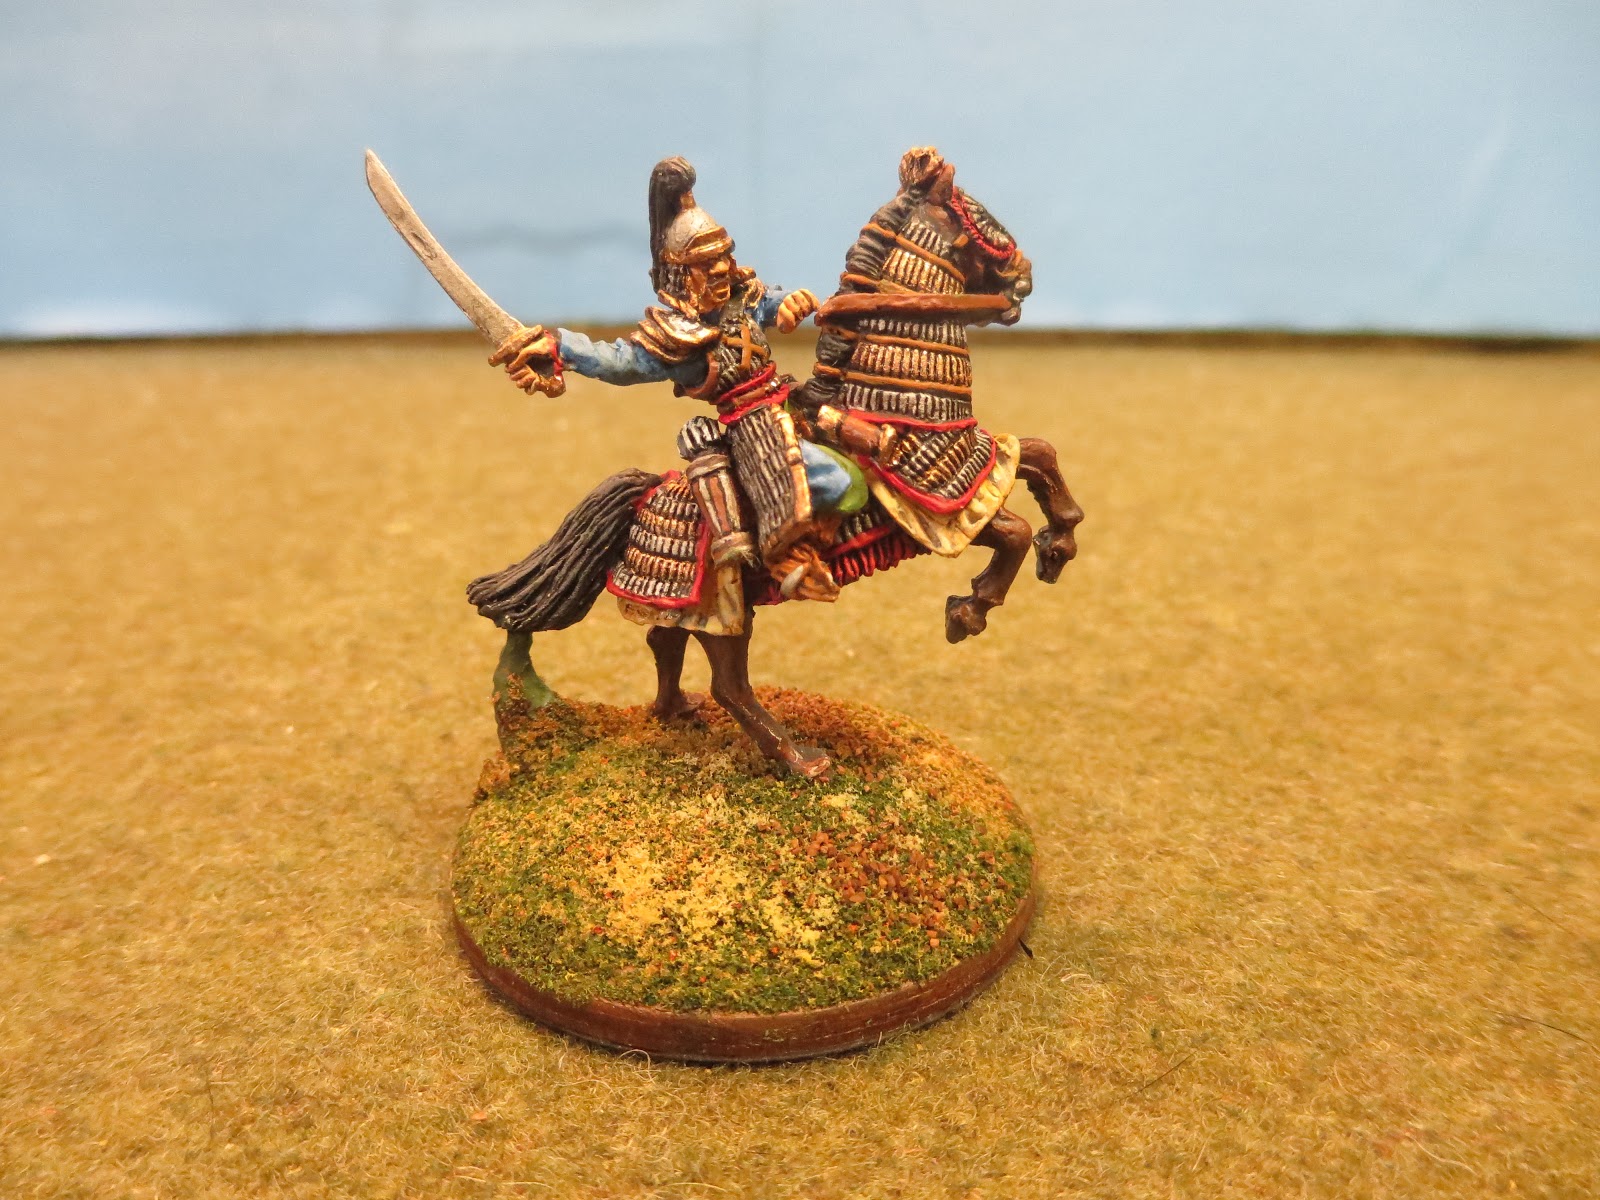
The confluence of plastic where the reins met on the horse's mane was quite wide.  Given the rider's hand position, I needed to trim this in order to seat the figure. Fortunately, this was quite easy to do and didn't impact the look or lines of the figure.

The figs as seen more from tabletop distance.

PAINTING GUIDE:
GENERAL NOTES
All colors are flat or matte (except for MM Gold). 
All paints are Enamels: Humbrols, Testors Model Master (abbreviated "MM" below), and Testors ¼ ounce bottles  (abbreviated "Testors").
Black Wash: Vallejo Black Wash (Dipping Formula Immersion)—used as wash, not dipped.

Black Wash Technique: Black wash (thin or regular), then gone over again in either the original color to highlight and clean up the "dirty" look left behind by the wash or a lighter color to add effects. For brevity, if the description just says “black wash," then it was also highlighted in the original color.

PRIMER:  I primed the figures in white (I'm a white primer guy).  

BOTH RIDERS
Face & Hands: Humbrol 61 Matt Flesh with thin Black Wash
Eyes: MM Light Gray
CAMEL DRUMMER
CAMEL
Camel Torso: Base: MM Military Brown Black Washed then Highlighted with MM Dark Tan Camel Cords: Underpainted Black then painted with Humbrol 62 Leather 
Camel Bit: Underpainted Black then painted with Testors Flat Steel 
Saddle Blanket: Humbrol 80 Grass Green then then Black Wash 
Saddle Pad: MM Leather 
Leather Pouches: MM Leather then Black Washed 
Other Bags: MM Flat Light Gray then Black Washed and Highlighted MM Flat White 
Rolled thingy: MM Dark Tan with Black Straps then Black Washed 
Drums: Humbrol 100 Red Brown with thin Black Wash 
Drum Heads: Humbrol 103 Cream with thin Black Wash, Highlighted with MM Light Gray 
Drum Cords: Underpainted black then painted MM Light Gray—brushed with MM Flat White 

RIDER
Sleeves: Humbrol 74 Linen Yellow then thin Black Wash & Highlighted with Humbrol 81 Pale Yellow 
Chainmail: Underpainted Flat Black then brushed with Testors Flat Steel 
Felt Coat (small bit showing between chainmail and sleeves): Humbrol 113 Rust 
Trousers: Humbrol 157 Matte Azure Blue Highlighted with Humbrol 89 Middle Blue 
Boots: Humbrol 62 Matt Leather Black Washed 
Hat and Earflaps: Humbrol 62 Matt Leather Black Washed 
Hat Lining: MM Light Gray, Black Washed, Highlighted with MM Sea Gray & Dappled with MM Flat White. 
Drumsticks: MM Italian Dark Brown 
Scabbard: MM Leather
Scabbard Ornaments: Testors Flat Brass Highlighted with MM Gold and Outlined in Flat Black. 

Sword handle: Black grip with knob in Testors Flat Brass Highlighted with MM Gold 

TSUBODAI
HORSE
Legs & Head: Underpainted MM Burnt Umber then Brushed with MM Burnt Sienna 
Tail and Mane: Flat Black Brushed with MM Gunship Gray 
Blanket (showing under armor): MM Sand, Black Washed and Highlighted with Humbrol 81 Pale Yellow 
Scale Armor: Underpainted Black then brushed with alternating lines of Testors Flat Steel and Testor’s Flat Brass, the latter  highlighted with a light brush of MM Gold. 
Head Armor: Testors Flat Brass brushed with MM Gold. 
Head Ornament: Underpainted black then Brushed with Testors Flat Brass and Highlighted with MM Gold. Black lined at joint of face armor. 
Armor Edging: MM Insignia Red Brushed over with Testors Flat Red 
Harness: Humbrol 62 Matt Leather 
Reins: MM Leather 
Saddle Rear: MM Natural Wood & Humbrol 113 Rust--edged with Testors Flat Brass. 
Saddle Front: Humbrol 113 Rust. 
Whatsit? Cylinder on Right Side: MM Leather with Testors Flat Brass Brushed with MM Gold, outlined in flat black. 
Quiver: MM Leather with ornaments in Testors Flat Steel outlined in flat black. 
Arrows: Underpainted Flat Black then brushed with MM Light Gray and Highlighted with MM Flat White 

RIDER
Scale Armor, and Helmet: Underpainted black then brushed with Testors Flat Steel 
Horsehair Plume: Flat Black Highlighted with MM Gunship Gray 
Armor Edge (Lower Front and Bottom): Underpainted black then in Testors Flat Brass  Highlighted with MM Gold 
Inlays on Shoulder Scales, Helmet Spike, Visor & Edges: Underpainted black then Testors Flat Brass Highlighted with MM Gold. 
Chest Straps: Humbrol 62 Leather 
Arm Hole Lining : MM Leather 
Scabbard and Bow Holster: MM Leather with Testors Flat Brass Highlighted with MM Gold ornaments underpainted/outined in Flat Black 
Bow: MM Natural Wood; Tip in Testors Flat Brass Highlighted with Testor’s Gold; 
Bow Inlays and Ornaments: Black Bands with Testor’s Flat Brass Highlighted with MM Gold. 
Undercoat: MM Bright Blue with thin Black Wash & Highlighted with Humbrol 89 Middle Blue Trousers: Humbrol 80 Grass Green with thin Black Wash 
Boots: Humbrol 62 Leather Black Washed 
Sash: MM Insignia Red Brushed with Testors Flat Red
Belt: Humbrol 62 Leather. Buckle underpainted Flat Black & then Testors Flat Brass touched with MM Gold. 
Stirrups: Testors Flat Steel 
Sword: Blade, Testors Flat Steel; Guard, Testor’s Flat Brass brushed with MM Gold. Black Washed.  
Sword Lanyard: Testor’s Flat Red 

 Excelsior!

Sunday, July 28, 2019

19TH CENTURY RULES PAGE UPDATE

 Feldmutzkopf is pleased.

This is just a brief post delivering news on an update I had mentioned was coming.  I have updated the Volley and Bayonet Post Napoleonic Variant files on the 19th Century Rules Page.  These are slightly evolved from the  Battle of Hatvan game rules--so if you downloaded the reference sheet from that battle report, this one is different: a few tweaks to the half battalions (a more streamlined version than in the Hatvan player reference).  


To find the latest files, scroll down to the Volley and Bayonet area on the 19thC Rules content page until you get to the "Current Notes and Reference For Post Napoleonic VnB Variant." You'll find links to an updated set of notes and information along with player reference sheet, terrain effects chart, and an 1866 supplement (not yet tried).  The Battle of Hatvan OOBs are there as well to provide an example of the system in use.  
 
 Excelsior!


Sunday, July 21, 2019

POLISH LEGION OF THE HUNGARIAN REVOLT


The latest: Steve Barber Polish Legion Advancing (and Officer)

This brief post, dear readers, is a delayed update on the recent completion of a contingent in my Hungarian Revolt forces: the Polish Legion (infantry).  These fellows actually marched onto the table with the Hungarian flanking force in the Battle of Hatvan game, but did not see any action.
Earlier Polish Legion (Converted Murawski Napoleonic Poles)
.
Long time readers of this blog may recall that prior to these figures being available in the Steve Barber Hungarian Revolt line, I had done this unit by converting Murawski Napoleonic Poles. Although I was happy with that conversion, I could not resist adding the actual Polish Legion figs to the force once they became available.  The proportions of the SB are more consistent with the remainder of my Hungarians (and I'll admit, because I liked the look of them). As usual, in this post you may clix pix for BIG PIX.
These were fairly straightforward figures and uniforms: very business like and utilitarian...
...except for the splendid low-form red czapka, of course, which makes the unit really stand out on the table.  After much research, I decided to not embellish the czapka top with the usual crossed white lines.  References indicate that the artillerists had a black "box" on the czapka top, but there are no specific references to any embellishment of the infantry czapka. From what I gleaned from images, none of which explicitly detail the top of the headgear,  there is little or no indication of anything that would stand out.  So I decided that the plain caps work well with the overall look of the uniform, with the unadorned red rectangular shape still giving quite an impression. 
 The early Polish Legion White Uniform (Figure at left) 
 

 Polish Legion in Later Blue Uniform from The Honved Army 1848-49 Gyozo Smogyi

In response to such appearances, someone in our group will usually quip, "They look pretty, but can they fight?"  I think the below excerpts about facing the Poles from Scenes Of The Civil War in Hungary in 1848 and 1849: Personal Adventures of an Austrian Officer answer that question:
Excelsior!

Tuesday, July 2, 2019

GAME REPORT: BATTLE OF HATVAN, 2 APRIL 1849, HUNGARIAN REVOLT

Mark D considering the situation on the Hungarian left flank.
I am happy to report, dear readers, a double achievement.  First, that I have broken the year-plus drought of hosting games at my place (it's been too long!). Second, that I have achieved the long anticipated debut of my Hungarian Revolt figures in a game with an updated version of my Volley and Bayonet post-Napoleonic battalion scale variant (I'll post links to the rules and references at the end of this post).  Although this is not yet my Chocolate Box Wars (CBW) system, the concepts I'm proofing in the VnB variant will inform that product, so this is also progress on that front as well.  In this post, you may clix pix for BIG PIX, as usual.  You can also find a game report on Mark D's blog

Austrians Destroying the Bridge on the Zagyva river before retreating.
Public Domain.  
This game was inspired by the Battle of Hatvan, 2 April 1849, between the Austrian III Corps and the Hungarian VII Corps.  I say "inspired" because, as I've related before, I take a historic battle and create a game out of it.  This involves some license to fit the scenario to the figures and resources available, to conform it to the rules, and to produce something playable in the context of the day.   The Battle of Hatvan provided an excellent model for what I was after: it was a a meeting engagement between a Hungarian and an Austrian Corps, just the thing to have both sides active vs having one sitting and one moving.  You can read about the actual battle at the link above.  I followed the historical flow conceptually, with the Austrians coming on strong early and a smaller initial Hungarian force holding on while waiting for help to arrive...
 THE SITUATION
In the game, each side was roughly equal in strength. The Austrians had 3 infantry divisions plus a cavalry division.  The Hungarians had 3 infantry divisions with cavalry integrated into the brigades.  The Austrians began with two divisions (of their choice) deployed on the table, with the third coming on in turn 2.  They could have broken up the cavalry division and had it on the table with the divisions at start or have it as a complete command arriving on turn 2: they chose the latter. The Hungarians started with their 1st division in an advanced position perilously close to the Austrians.  Furthermore, it had to be spread out so that it had elements sited on each of the features in its starting position.  This was to represent the moment when the Hungarian lead division, which had been advancing across a broad front to develop the situation, bumped into the Austrians coming in force from Hatvan! The Hungarian 2nd division would enter on turn 2 from Hort.  The Hungarian 3rd division was coming on a flank march, but the Hungarians had no idea when it would arrive.  So, they would have to hang on until then.  The victory conditions were simple and intended to prompt a game with both sides "mixing it up" in order to proof the latest version of the rules and get players familiar with the system.  A side would win if, at the conclusion the opposing side's turn, it had either Hatvan (for the Hungarians) or Hort (for the Austrians) within  range of either artillery or infantry.  Simple.  Given that each corps had a river at its back, these conditions reflected the imperative of maintaining secure access to its crossing point  (represented on the table by the Hatvan and Hort templates). 
 THE STARTING SET UP
 Above: The Hungarian 1st division faces the lead Austrian 3rd and 1st divisions...
...close up the the initial forces, with the Hungarian 1st division (left) looking thin in comparison.

THE "MIDDLE GAME"
 Above: The Austrians attack. The Austrian 1st division advances to the left while the 3rd division pushes to the right.  The Austrian 2nd division arrives and pushes up the center while the Cavalry division rides hard for the Hungarian right flank. The Hungarian 2nd division arrived on turn 2 and deployed in depth...
...the Austrian 2nd division launches its attack, with a half-battalion of Kaiserjagers in the lead accompanied by a half battalion of grenzers (seen in the background).
Above: the Hungarian 1st division takes up reverse slope supported by artillery, posting the dauntless German Legion forward to blunt the Austrian onslaught. In the distance, a lone squadron of Hungarian hussars opposes an oncoming Austrian brigade of the 3rd divison...
...farther down the line, the 2nd brigade of the Austrian 1st Division closes with the isolated right brigade of the Hungarian 1st division...
 ...and the Austrian Cavalry division rides behind the action towards the open Hungarian right. 

THE AUSTRIANS PRESS THE HUNGARIANS
Above: It's hard to make out the markings (in green), but they show that during the fighting two of the three brigades of the Hungarian 2nd division were committed to extend the Hungarian line and shore up the defense, leaving only two battalions on the final position. Just visible at the far right, the leading unit of the Hungarian 3rd division can be seen entering. Will it be soon enough?...
 ...the "Gray Attila" battalion of the Hungarian 2nd division moves down to support the hard pressed 1st division. (Above right), the 3rd brigade (green strength markers) of the 2nd Hungarian division deployed on the left end of the 1st division line...
...the view from behind the Freiwilliger Jager half battalion of the Hungarian 3rd brigade, the far left unit of the Hungarian position...

THE CRISIS OF THE BATTLE
Above: The Austrian 1st division has spent itself against the right of the Hungarian line, but the Hungarians line here has been battered and reduced.  The Austrians are on the verge of a breakthrough in the center, even as a threat starts growing on their flank (very much like the late stages of Waterloo)...
...the remaining two brigades of Hungarian 1st division heavily engaged and pinned down on the left end of the Hungarian line...
...view of the Austrian breakthrough from the "red cap" Hungarian heavy artillery battery.  Will it become another legendary "battery of death"by making a last stand here?

 THE RACE IS ON
Above: In a stop gap move, the Hungarians throw whatever is available in front of the Austrian 2nd division. Meanwhile, the Hungarian 3rd division is present in strength and starting a threatening flank march around the Austrian left. The race is on! Sensing that time is running out, the Austrians begin to pull units back while making one last "all or nothing" push...
...the Austrian cavalry division is launched in a classic "death ride" around the Hungarian right...
 ...the dashing cavalry half-battery and dragoons lead the charge.  This would represent the high water mark of the Austrian advance (and high drama point of the game, as well!). Ironically, the Hungarian hussar (seen in in the background to the right) would lose its melee and fall back to an ideal position to deal with the the Austrian cavalry battery.   Enough other units were able to be pulled back and on the way to forestall the threat to Hort.  With the "death ride" thwarted and the Hungarian 3rd division closing in on Hatvan, the Austrians graciously ceded the game at this point, although it was a near run thing! 

The stuff: You can download the orders of battle, setup diagram, notes on the rules variant, player reference sheet, and terrain effects chart on the 19th Century Rules Content Page.

A DAY OFF FROM WORK SPENT WITH GOOD FRIENDS...
The Hungarians, left to right: Byron (3rd division), Charlie (2nd division), and Mark D (1st Division). 
The Austrians, left to right, Ralph (3rd division), George (2nd division), and Mike (1st division and Cavalry division). 

 ...TOY SOLDIERS...

 ...AND DONUTS...

 What could be better? 

Excelsior!

Related Posts Plugin for WordPress, Blogger...