One-Armed Northstar 1864 Danish Dragoon
The recent expansion of the Northstar 1864 figure lines, specifically the addition of a Prussian mounted command set, Prussian dragoons, Prussian hussars (of the non-death-head variety), and Danish dragoons, prompted me to round out my mid century Prussians and Danes. This project will involve a new Prussian hussar, a new Danish dragoon, two new Prussian dragoons, and a new Prussian command figure. So this is a multi-phased project that will take some time. As I was thinking about getting started, however, I found myself contemplating the troublesome chore of attaching the sword arms to most of these figures (a "feature" of the Northstar cavalry--and an all too common one, for my likes, among contemporary figures in general). Let's just say that I'm not a fan of separate sword arms, especially when they all wind up looking pretty much alike in the end, anyway. Because the Northstar sculpts are so exquisite, however, I am willing to put up with this pain-in-the-a** step (as I was for my Mongols, but I digress). I guess I'm not a modeler at heart since I don't relish this part of the hobby. Back on topic: rather than spreading out this pain over multiple iterations, I decided to do the prep up front for the lot. Thus, in this post, dear readers, I present my method for handling the troublesome task of attaching sword arms to figures. This also works for other bits--I'm sure others have their methods, but I hope someone may benefit from seeing how I do it. In this post, you may, as usual, clix pix for BIG PIX.
THE MATERIALS
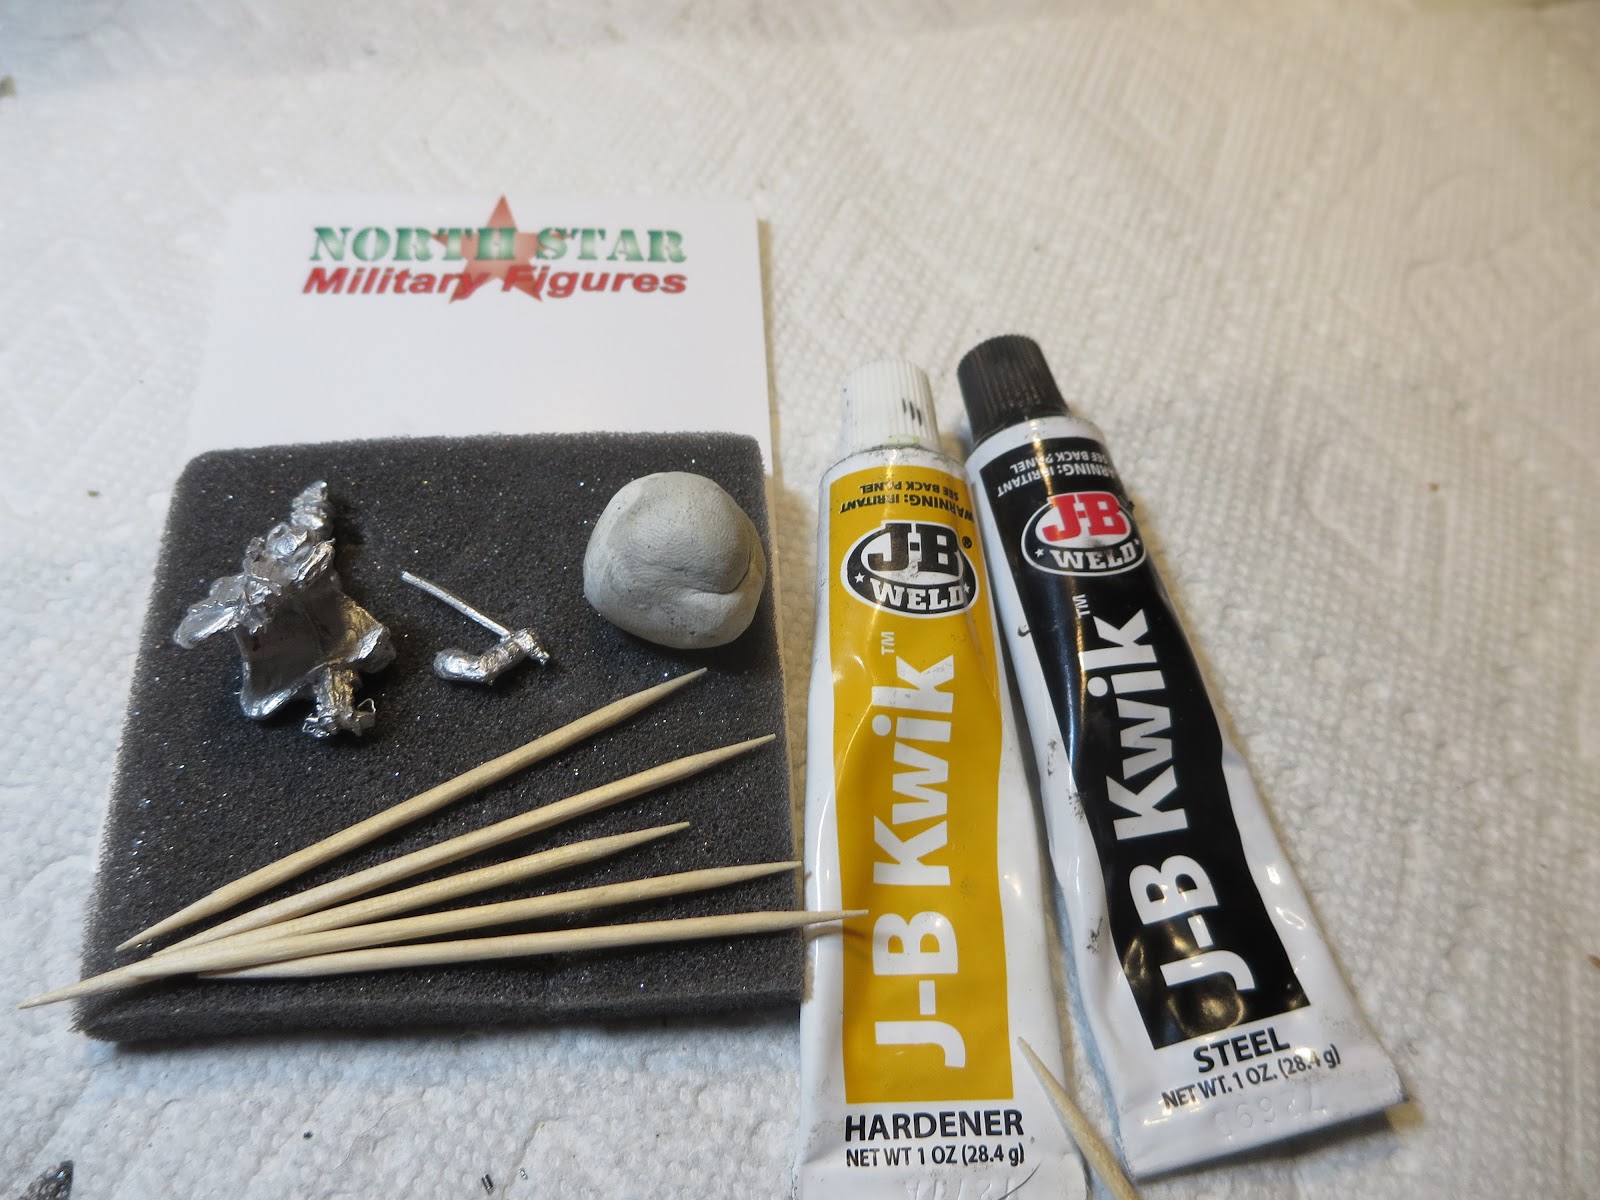
In addition to the figure(s), I use toothpicks, some hobby-tac (putty of any type will work), and J-B Kwik Weld, which is a two-part epoxy. This is the quick drying version of a "liquid weld" which is the sort of thing that they use to mend cracked engine blocks: let's just say that it handles metal-on-metal very well, indeed. The downside is that it is not tacky, so no help in holding parts together before it's dry--but I have a solution to this problem, if you will but read on. I use this stuff for all my metal on metal figure projects rather than the various super glues--which may be easier to use on the front end but which often fail when figures get handled. We've all witnessed or experienced that awkward moment when a sword arm, weapon, or standard gets bumped and goes spinning off to lay accusingly in the center of the table--or worse, it zooms to nether regions off-table, a small "click" being the last thing heard when it disappears into another dimension. This will never happen with J-B Kwik: trust me. You'll only have to attach these bits once, and they'll stay put (as for doors into other dimensions, you're on your own).
STEP ONE

Take a bit of hobby-tac putty and roll it into a small ball

Push the ball onto the figure so that it conforms to the shape and holds in place. 


Put the sword arm (or whatever) in place, making sure that it makes an impression in the hobby-tac putty: push the putty up and around the sword arm to create a solid mold that holds it in place.

You now have a stable, dry test fit for your sword arm. Since you'll be taking the sword arm off again, you''ll want to make sure that you don't wrap the putty around it. Set the little fella aside.
STEP TWO


Squeeze out equal parts of the J-B Kwik Weld (white hardener and black "steel"). Take a toothpick and mix them together until they are a consistent gray color. You will have about 10 minutes to work with this mixture before you might need to do another batch: a little will go a long way.


Take your figure and remove the sword arm, pulling it away to leave an indent in the putty where it used to be. This will not only hold the arm but will help to guide you when putting it back in place.


Pick up a glob of the Kwik-Weld on a toothpick and dab it into the arm socket.

Put the sword arm in place. You can play around with and adjust the fit at this point. As needed, scrape away any excess weld with a toothpick. It should be noted that the Qwik-Weld also works as a good filler.
.
.
STEP THREE

Place the figure in a secure spot and let the epoxy set...

...repeat for as many figures as needed.
.
.
It
is probably fair to say that in addition to necessity, aversion may be
the mother of invention. It was my aversion to sticking bits together that caused me to come up with this solution. If it
works for me, then I think it could work for pretty much anybody!
.
.
BONUS COVERAGE


As long as I was in the neighborhood, I thought I'd conclude with a bit of a work-in-progress post. I put the riders on these handy painting stands, tailor made by my friend, fellow blogger AJ. The riders are held in place on these stands with a bulb of hobby tac (I believe AJ glues his). For this (and other like projects), I match horses and riders ahead of time, test fitting them and modifying as needed so that they sit squarely. Then I glue the horses to popsicle sticks (a fairly standard move). In the above picture, you see the riders lined up with their assigned horses. All well and good, but how to make sure that the riders will be matched with the right horses once all of this gets moved around--and covered over in white spray primer?

Answer: the bottom of each of the rider-stands is numbered. I mark the underside of the sticks holding the horses with the corresponding rider numbers. I can then move them around as I like and also spray prime the lot without losing this information. After priming, I'll take a minute to write the numbers on the topside of the rider stands and horse sticks for easy reference.
.
.
Well, dear readers, the horses and riders are matched; the figures are prepped and ready to prime: it's all downhill from here!

Excelsior!