
In this post, dear readers, I present a study of my recently completed Northstar 1866 Prussian Uhlans. Some may recall that this project got pre-empted by a sudden turn to the Balkans (see Romanian Hussars). For this next project, I returned to schedule (such as it is) and proceeded with the previously planned Prussian pigstickers (how's that for alliteration?). Looking on the interwebs for examples of how others might have done a set of these, as I do when beginning a project, I found only one other example--a superbly done unit on the most excellent Command Base blog, which I heartily recommend if anyone hasn't yet been there. Thus, I hope that my offering helps to expand the pool of references for other painters interested in the era and to the appreciator of toy soldiers in general. In this posting, as usual, you may clix pix for BIG PIX:

1870 Prussian Uhlan in "Mortarboard" Czapka
.
In most cases, Prussian kit for 1866 and 1870 are pretty much interchangeable. However, in the case of Uhlans, the 1870 headgear (I believe it is designated the 1867 czapka) differs from the earlier, representing a shift to the modern with its stylized "mortarboard" lines. The earlier czapka (of these figures), on the other hand, is still the traditional form, linking back to the Napoleonic era--albeit evolved (think the cover of Flashman). Although both are stylish in their own way, I think the Victorian czapka is more elegant and adds to the allure of these particular figures. Interestingly enough, if one includes the guards, Uhlans were the most numerous of the Prussian cavalry regiments mobilizied in 1866. There were 15 uhlan regiments vs 13 hussar, the next most numerous type--although some of the hussar regiments had 5 squadrons, tipping the overall number of cavalrymen back in favor of the hussars (7,800 hussars to 7,200 uhlans). The point remains, though, that this illustrates the trend towards lance armed cavalry that was well underway by that time. Eventually, all classes of Imperial German cavalry would be lance armed. For my project, I chose to represent the 9th (2nd Pomeranian) and 12th (Lithuanian) Uhlans...
.
.
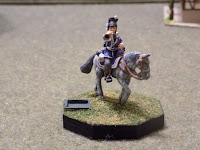
9th Uhlans


I chose the 9th because the white distinctions would contrast nicely with the dark blue base of the horse furniture and jackets and exhibit the classic elements of the lancer uniform (and I also must add that if I was going to go through the effort of scribing all these lines that they might as well be easily visible!). The figures came with cast lances, but I replaced them with Northstar spears, clipped to the same length. The lance pennants are the black over white 1815 Prussian Napoleonic versions (from GMB Designs). I turned them upside down to represent the white over black 1866 Prussian pennants (let it be our secret!).


The crouching/leaning pose of the charging uhlans is unlike anything I've seen. It wasn't until I was fiddling with putting these figs on their mounts that I realized that they were "leaning forward" this much. They manage to crouch without looking like they're drunk or falling forward off their mounts--I think it's the upturned head combined with the overall anatomical rendering that makes the difference.
.
12th Uhlans


I chose the 12th Uhlans because of the rather smart light blue distinctions, in contrast to the white and blue of the 9th (see what I did there...contrast, blue, white...never mind). I did have concerns about how the light blue distinctions would come out against the dark blue base. However, I rather like the way that these came out, even if they are a bit more subtle.


Two closeups showing the incredible sense of character that these sculpts have (indeed, as do many of the Northstar--ne Helion--1866 and 1864 figs). The Northstar horses are fine, but aren't quite to the same level, I must say...

...in a happy accident, as recorded in an earlier post, I once matched Northstar sculpts (Austrian Command figures, above) with Front Rank horses, and found that this was a superb combination. I haven't used it beyond these particular Austrian commanders, but it's an interesting option, I think. But I digress...back to the current project:
.
.
Trumpeter


I could not help myself and so decided that I had to include a trumpeter, even if I knew that it would mean that there would be a spare figure. The distinction of the yellow on white in the swallow's nest (for the 9th Uhlans) does not stand out very well, but I stuck with the historical scheme rather than doing some other combination. In the end, I decided to mount him on a command stand. Normally, I wouldn't do this. However, I only have two Northstar Prussian mounted officers, and they are out of production. Thus, I decided to stop being so precious about details and expand my available Prussian commanders by using the wargamer's expedient of a specialty figure--like a musician--in place of an actual command figure. Now, I have reason to actually use this smart looking fellow on the table, perhaps even leading a cavalry division or brigade.
.

.

Teetooot Tatoooooo! Charge!


