Monday, January 31, 2022

SAXONS AT KONIGGRATZ: BLOODY BIG BATTLES MEETS KRIEGSPIEL II


Playtest game of 1/2 scale Bloody Big Battles (BBB) using Kriegspiel blocks on a half-scale Koniggratz Kriegspiel map.

In this post, dear readers, we follow up on a previously reported work in progress on putting together BBB at the half scale using Kriegspiel Blocks.  That project has now been realized and I've run the first playtest, which will be the subject of this game report.  I won't go too far in this post on what I've already conveyed in my previous post or on other aspects of putting together maps and materials--I have more in depth information and resources posted on my newly added Bloody Big Battles Resource Page of this blog (there is material there for standard play BBB as well).  But now, on to the battle report.  As usual, in this post you may clix pix for BIG PIX...

I began by referring to the excellent set of scenarios in the European Bloody Big Battles supplement. Given my previous interest in and resources for the 1866 Prusso-Austrian War, and having the Kriegspiel Maps, Koniggratz in digitial form in particular, I decided to work with the Koniggratz scenario.  

I picked the conflict in the southern sector between the Saxons (and adjacent Austrian elements) and the Prussian Army of the Elbe as suitable for a nicely sized test game. The OOB is above (you can also download a pdf of the scenario (with OOB and map).) 

Above, a part of the the southern portion of the huge Koniggratz Kriespiel map with the Saxons laid out for test purposes.  These sheets are printed out at about half size (roughly 1:15,000 as opposed to the original 1:7,500). I put together the nine mapsheets (outlined in red) for the game.  For more on scales, how blocks are configured, etc, I would refer you to the previous post and to the "Guide" on the BBB Resources page.  
The nine sheets trimmed and put together and then put under plexiglass. At roughly 3' x 2' this represents a 4' x 6' playing area and provided more than enough space for a good game (it also fit nicely into a poster frame, which was a happy accident, as reported in my previous post).   
I then used water based paint pens to bring out some terrain features for the game. The Bistritz River had a major impact on action in this sector, so I made sure that it stood out (blue).  BBB differentiates between "Towns" and "Villages" and between regular slopes and  "Steep" slopes. To define them, I outlined BBB "Towns" in black (any other urban feature not outlined would be a "Village" in game terms), and I marked off sections of steep slopes with brown lines.
 
One thing we changed in practice was the formation for units occupying "Towns." Rather than trying to stick to either Line or Depth formation (per BBB), we decided that units in towns were in no "formation"--we simply put the component bases inside the town and conformed them to its shape.  The unit would have 360 degree facing, with the center of the town serving as the FCP (Front Center Point when it came time to calculating movement out of the town); all bases could fire out (in 360 degrees).  However, rather than measuring from the individual bases, fire is measured from the FCP of the unit (ie, center of the town) to the target.  Otherwise, all the rest of the BBB mods and visibility effects applied.  This worked very well as an abstraction for a major formation holding a built up area.  The shape and orientation of towns lent them unique qualities--long linear towns, for instance, and which way their faces were oriented, made them very different animals than more symmetrical or equilateral towns.

Overview of the scenario.  The "main" battle is raging just off the map to the north. The Saxons are deployed in depth in the South, with the Prussian Army of the Elbe coming up with orders to attack across the Bistritz. For this scenario, I included the southernmost (Wimpfen's) brigade of the X Austrian Corps, which was engaged in the "major" fighting to the North. Behind the Saxons, the Austrian VIII Corps is in reserve (in history, this unit had been mauled in previous engagements, which I assume is why it has only one brigade, albeit a big one).  The objectives are in Saxon hands: holding them represents safeguarding the southern flank of the Austrian Army. 
The Prussian Army of the Elbe's entry edge. It can start 1 division on the map within 6" of the marked entry area/edge. The rest enters on turn 1 from the entry edge. You might have noticed the labels for each division (plus battery) unit: I took this idea from Mike C (fellow BBB enthusiast in our group, who I believe got it from somewhere on the web).  These worked out well.
I was very involved with facilitating the game, so there aren't lots of shots of the individual happenings. Instead, I'll illustrate the action graphically. Above: the Saxon maneuvers. In the role of Crown Prince Albrecht of Saxony, Mike C. decided to defend forward, bringing up the Saxon 2nd Division online with the 1st overlooking Bistritz.  Wimpfen's Austrian Brigade was moved down to Tresowitz to challenge any crossing there (and also to range across the front of the Saxon positions). The Saxon rifled artillery maintained its position on the commanding hilltop south of Tresowitz. The Austrian VIII Corps was intended to come up to extend the line, but (characteristically), it was delayed (failing movement rolls and rolling partial moves), only getting to about where the arrow shows by the end of the action. Although Mike C had an extraordinary run of lousy movement dice with these, it seemed right, regardless. This is not uncharacteristic of BBB and does a nice job of reflecting friction.  In this case, I think it prevented (very realistically) a sort of clockwork precision in maneuvering major formations simultaneously over distances to take up positions in relation to one another: simple to do on a wargame table, not so much in practice (as it turned out). 
George, in the guise of Gen von Herwarth commanding the Army of the Elbe, led with the 15th Division on the map with the rest marching on behind.  Initially, the 15th Division, supported by the 16th, went for the town of Sobetus (opposite the Popelwitz crossing) with the idea of forcing a way across there.  However, the combination of the shorter range of the needlegun vs the longer range fire of the Saxons, who could not easily be closed with due to their being upslope and behind the Bistritz, kept them at arm's length. They would wind up shifting around to keep the Saxons fixed in their positions while suffering the long range fire from the Saxons on the ridge and Wimpfen's Austrian brigade in Tresowtiz.  The Saxon battery concentrated its fire on the Prussian guns any time that they came within range, hitting them while still limbered, reducing and silencing the Prussian rifled battery and forcing the Prussian smooth bore battery to reverse march and not come into action. Eventually, the Prussian 14th division worked its way across the Bistritz to the south, sending the small Saxon cavalry division posted there off and then coming into position to threaten the Saxon line.  This is where the tardiness of the  Austrian VIII Corps was very much felt (it being still out of the picture). Meanwhile, the move of Wimpfen's Austrian Brigade down into Tresowitz had opened the door on the Saxon right, through which the Prussian Cavalry brigade trotted. This was to prove decisive...
... the Saxon battery did not get to reorient, leaving the Prussian Cavalry brigade in position to assault it in the flank in the next turn, which it did. Keep in mind that this is 1866, and cavalry is not the force that it would be in an earlier period, which made what follows even more dramatic. Given the unique circumstances, the battery had no defensive fire (which could very well have stopped the cavalry charge), so it went directly to assault resolution. Assaults in BBB are done with a challenge die roll by each side (modified by various elements).  In this case, the Prussians rolled high and the Saxons low, which resulted in the artillery being eliminated and the Prussian cavalry getting an exploitation. This carried it into the rear of the Saxon 1st division.  Given that this was a Saxon full division vs a small cavalry brigade, modifiers in the in this second assault, despite it coming from a flank, were not so lopsided as the previous, but General Dice was riding with General of Cavalry Golitz this day, and the Prussian Cavalry prevailed, inflicting a base loss and forcing the Saxon 1st Divsion to retire!  Given that by now we had proofed the system and that the Austrian VIII Corps was still not even in the picture, we determined to end the game at this point, under the understanding that the Saxons would be obliged to abandon their position to the Army of the Elbe: victory to the Prussians.   

HOW DID IT PLAY?
We found that BBB, as a system, worked perfectly well in this format. We had no trouble executing moves or applying any of the mechanics. Again, I would refer anyone more interested in the details of the half scale variant to the BBB Resource Page for more. 
The biggest shift was not with the game system, but with the perspective of playing on a map  (in a good way).  It was an adjustment for everyone.  Playing on a map caused us to come up with our different way of handling Towns (for instance).  The above situation is a good illustration of what playing on a map brought out. At a glance, the Prussian division above appears to be in a dominating flanking position to the Saxons. However, when we were about to resolve the Prussian fire, we looked more closely and discovered that the terrain said otherwise (the red lines are the sight lines). In the above picture, I have added some dashed lines to bring out the topography under question. There is actually higher ground (two hilltops: a saddle) between the Prussians and the Saxons (although there might be some small part of the Prussian Div on a small hilltop of its own that might have a small window). Furthermore, half of the Prussian division is actually deployed on a downward slope that is looking at the backside of a ridge between it and the Saxons.  Thus, we determined that, collectively, the Prussians would get 2 bases of fire as opposed to the entire division, and we did not give it a flank bonus.  This and other situations like it were very much part of the experience.  Although we were not playing "kriegspiel" (as in hidden movement, etc), I would suggest that there be a non playing facilitator for any game played on a map like this--someone familiar with the terrain and map who can both help players interpret the terrain and make judgement calls like this. I fulfilled that role in our game (and we had no problems). 

Playtesters and amiable companions for the afternoon, Saxon Commander Mike C (left) and Prussian Commander George (red shirt).  As a result of the game and their suggestions, I made some minor adjustments to the player reference and a handling a few of the mechanics. We're now poised to move ahead and try a larger game!

Excelsior!

Saturday, January 15, 2022

PORTABLE WARGAME MEETS 2ND AFGHAN WAR


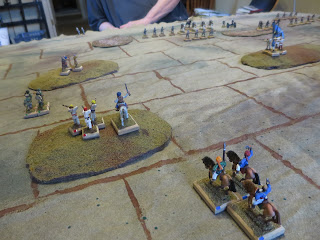
Khyber Knives cross Sikh Bayonets in the perennially troubled Dismal Province, Afghanistan, circa 1880.

In this post, dear readers, we meander into something completely different--Colonials.  This is another of my collections that has been fallow--but not forgotten.  I picked up Bob Cordery's The Portable Wargame (TPW) some time ago and ever since have had a project cooking in the background to put together some modifications to use with my Colonial/2nd Afghan War (era) figs. I finally got that together and was able to run a test game (of which this is the report). I am happy to say that changes were made based on this game and a second test game was run (no report, sorry).  As a result, the variant is now ready and posted among the content pages of this blog (more on that at the conclusion of this report). But for now, first things first: here is the battle report. As usual, you may clix pix for BIG PIX in this report. 
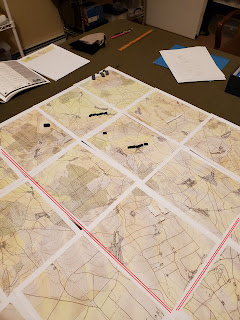
The environs of Naughtybad, scene of the recent unpleasantness.  Given that the focus of this game was testing the rules and variant, the layout was rather minimalist. The hills are self evident: the other patches are "rough."  For the curious, I detail how I created this gridded playing mat (with 6" squares) on the Portable Wargame Content Page of this blog.

The Soldiers of the Queen (entering from the bottom of the picture) are embarking on yet another punitive expedition in Dismal Province, Afghanistan.  It has come to the attention of the Politico that the citizens of Naughtybad have been skimming off contributions of the poppy harvest owed to the Great White Queen for their own use (such quaint local traditions are nothing new in these parts: Naughtybad is also known as "Happy Valley" among the locals...).  Nevertheless, such a slight to the authority of the Empire cannot be borne. 

The punitive expedition is gathered, with representative contingents from the Dismal Province Military District Force, Major C. Langley Smoot, District Commander, leading them himself. Their aim is to occupy Naughtybad and confiscate goods in compensation for the affrontery--and bust things up while they're at it.  In this game, my friend George would take up the cause of the Great White Queen.

Sharp-eyed observers may have noted the three infantry figures behind the Queen's Lancers. These represent the lancers in dismounted mode. For anyone familiar with TPW, units have strength points (average infantry 4, average cavalry 3, average artillery 2). One figure equals one strength point (in my game). As a bit of chrome, I rate British Cavalry as 4 SP when mounted, but 3 when dismounted (who doesn't prefer to ride?), hence why there are three foot as opposed to four here.  Well, that was a bit much of a diversion... 

Local Warlord and perennial foil of Maj Smoot, Ali Hassan bin Sober, given the usual advance warning of the coming expedition, has gathered the lads to give the Feringhee Dogs a hot time in Happy Valley.  For this game, your humble correspondent would take up the cause of the noble indigenous warriors against the foreign devils. 


Each side had a bonus figure (a trumpeter for the Imperials and a standard bearer for the Afghans) that they could assign to any unit (ie, as an extra strength point). This extra figure is a "freebie": its loss would not count against the exhaustion-level calculation. In this scenario, the Afghan exhaustion point was 11 strength points and the Imperial's was 10. 

The Afghans were waiting for the Imperials, deployed across the front with their mixed firearm infantry forward on the left and jezails holding the central highground. The melee infantry were positioned to support the shooters. The jezails on the key central highground were reinforced by the standard bearer.
Ali Hassan bin Sober posted himself in depth with the other jezail infantry so he could improve their long range sniping, with the tribal cavalry safely set back but at hand, ready to respond.  

Not being very sporting today, the Imperials load up on the left and refuse the right, with the main effort being spearheaded by the East Lancs and Gordons (in this scenario, all units were rated as "Average" with the exception of the Gordons, who were "Elite").  The Gurkhas, having drawn the "up the middle" lot, were reinforced by the bugler (in my variant, Gurkhas are as mobile as tribesman, so can negotiate rough terrain better than other Imperials). 
Being a fox hunting man, Maj Smoot rides with the Lancers, who would disdain dismounted operations this day. 

The ball opens...with the initiative, the Imperials advance online as if on parade at Aldershot, with their right smartly echeloned back.  The initial volleys and close assaults of the lancers and sikhs have attrited the jezails holding the central highland. At this point, the momentum of the Imperial advance seems irresistible.

This not being his first dance, Hassan bin Sober is not dismayed. The Ghazis answer by coming forward over the highland and pushing the Sikhs back; the tribal cavalry goes into action like a thunderbolt. The fight for the central highland becomes a back and forth affair. 

On the Afghan right, the melee infantry come forward into action to block the advance at the defile between the highland and the rough terrain. The Gordons would take it on the chin, leading to an extended scrum among the units on this wing.  Eventually, the Afghans would be attrited and have to give up the ground. 

Meanwhile, Maj Smoot decides that something must be done about the harassing fire coming from the Afghan mixed firearm infantry who are working their way around the Imperial right. And so he leads the Queen's Lancers into action, who get the job done in the finest tradition of the mounted arm, suffering casualties gloriously. 

Back in the center, the Jezails have been cleared from the highland, but the Ghazis remain defiant, causing the Sikhs to back off to more respectable shooting distance (not very sporting).

With casualties ticking up on both sides and time running out, George surveys the situation...
...and decides that quick action is needed, so he commits his alter ego, Maj Smoot, to lead the remnant of the 9th Lancers up the hill and into close combat on the flank of the Ghazis--providing another stirring "artist's rendition" of action on the Northwest Frontier to adorn the morning papers in Blighty, no doubt. 

A defiant parting shot. 

Although the 9th Lancers had paid a price, the Afghans had been pushed past their limit, and so they hastily packed up what remaining bales of poppy they could carry ("for later") and abandoned Naughtybad and Happy Valley to Imperials (for now...).  

As mentioned earlier, this was our foray into The Portable Wargame (and my mutation thereof), and we came away entirely satisfied with the experience. We were able to run through both this and the subsequent test game in about two hours each, both rendering interesting play that felt "colonial" as opposed to something more generic or simplistic.  In short, TPW produces a very good balance between playability and chrome: it has provided the opportunity for me to "rediscover" my grand old Ral Partha Colonials.  We're already looking forward to more games!

For anyone who might be interested, I have added a Portable Wargame Content Page to this blog. You can find and download the 2nd Afghan War variant used in this game there, along with the accompanying player reference sheet and unit roster. 

Excelsior!

Related Posts Plugin for WordPress, Blogger...