Showing posts with label Game Design. Show all posts

Wednesday, December 31, 2025

NEW YEAR: NEW STUFF (LION RAMPANT II RESOURCES)


A group of us are gearing up to present a club "game day" in April pitting Mongols vs Western forces using the Lion Rampant II rules. For those who may not be familiar, our club generally has one Saturday "game day" per year that features a large format event. This year, we will be putting 650, 28mm figures down across three connected tables, with 18-24 players divided into two teams (Mongols vs Westerners). In support of our efforts, I have put together a few more products and updated the  Lion Rampant II Resource page. 

So, to put the bottom line at the bottom, this post is simply an announcement that the aforementioned resource page has been updated with the following...


The chart is divided into the definitions of the terrain categories (top) and then the specific types of terrain and the categories they fall into (bottom).  Items in parenthesis are conditional effects. 

I made a similar product for Pikeman's Lament but had not yet done one for LR II. So, in preparation for Game Day, I did one for LRII. There are two versions. Version 1 (with the yellow header) conforms to the rules. Version 2 (with the black header) is a modified version. Regarding the modified version, we added a narrow stream and modified the ditch effects (combining both on the same line). They both affect movement and close combat, but have not effect on missile combat. They are both on the same pdf for efficiency. Just be aware of which one you are using if you grab these.

These are drawn from the special leader characteristics and others inspired by them and put on small cards. The concept is that these can be cut out and given to players to employ as one-off events (which is how we'll be using them during the Game Day).  You can use these in addition to the leader effects (they aren't exclusive of one another), but these provide a way to incorporate these effects into the game in more discrete ways.  I'll probably work up a version of these for Pikeman's Lament. 


Exceslior!

Saturday, April 5, 2025

UPDATE: CHOCOLATE BOX WARS, CONVENTIONS, AND HARD DRIVE CRASHES


My bully Hungarians advancing across the field in one of the games in our ongoing Chocolate Box Wars (CBW) Tournament.

Hail and greetings, dear reader(s).  There has been much going on in parallel lately.  And as any bloggist will tell you, time and energy must be divided between "doing" and posting (although "posting" is also "doing," but it competes with other "doings" if you catch my drift). So in this post I'll provide an overview of recent (and ongoing) actions, with a promise of more focused reports to follow.
  
CHOCOLATE BOX WARS RULES UPDATE
I do want to state up front that there is some important Chocolate Box Wars news. There is a rules modification (Rally) that we are using--along with an accompanying updated Player Reference that reflects the new Rally process. It can be fond on the CBW Tournament Page. Speaking of which, the aforementioned tournament page is a new addition to this blog as well. On it, we are tracking the progress of our round robin CBW Tournament. There, you will also find links to two videos I've posted, one explains the new Rally rule and the other the Retire and Reform rule (not changed, but one that seemed to need clarification).   I will add that the "old" Rally Rule found in Version 1 of the CBW rules (the one currently posted) works fine.  But upon further reading of the 1914 rules, I found that I had misread the "Morale Test" from which my Rally process was derived, and I decided to adjust it accordingly. I'll drop the Version 1 Rally Rule into the optionals in forthcoming Version 2 so it will still be there for those who may prefer it.  For anyone who wants to play CBW with the new Rally Rule before Version 2 is posted, I would suggest you view the video and download the new player reference.

CHOCOLATE BOX WARS TOURNAMENT
Six players are engaged in a round-robin CBW Tournament. You can view the players and their armies on the CBW Tournament Page. There are some other materials, there, as mentioned. The General's Guide pdf there will provide the curious more about the tournament and includes the detailed army lists.  In sum, each player constructed a CBW army using the base system and will play once vs every other player once. This is providing us with another good stress test for the rules in general and the revised Rally Rule in particular: so far, no issues. I've played three games but have yet to get a game report together. I will say that each of my games has been a "near run thing" as have most others that I've heard about. This bodes well for the army construct model since there has only been one "lopsided" affair that I know of which seems to have been down to the caprice of General Dice more than the system itself.  So far, so good! For Tournament battle reports I would direct you to AJ's Wargaming Blog and Mark D's Gaming Site. In the meantime, here are some shots of the games I've played in or observed (as usual you may clix pix for BIG PIX).
My first game was against AJ and his Austrians (A loss for my brave but game Hungarians).
My second game was against Mike and his Danes (army on loan from me). A seesaw affair, but I pulled it out in the end. 
My third game was against Earl and his Romanians (another loaner army). Late in the game, with the result in the balance, Earl's dice went cold on a key counterattack and so I was able to riposte and push his army to exhaustion: a nail biter!
The game I sat in on: (left) Mark D and his British Intervention Force vs (right) AJ and his Austrians. 

I am proud of my own CBW Armies, but I have to say that these two armies (Mark's British and AJ's Austrians) are little short of stunning, particularly when seen paired off on the same table. I can't think of a better representation of the asethetics of CBW than the look of this table. I would encourage you to enlarge the photos to give them a good decko. This game happened the night prior to this posting: a battle report may be forthcoming on either AJ's or Mark's blog, so watch those if interested. 

CONVENTIONS
Once again, I'll be attending the Mayhem Convention in Lebanon, NH.  This year, I'll be running two games. On Friday evening at 7:00 pm, I'll be running a Chocolate Box Wars, "Borscht and Goulasch, Russians vs Hungarians": a game that I've playtested at home and brought to a club game night.  On Saturday evening at 7:00 pm, I'll be once again running my Joust for the Fun of It game. My gaming club will be well represented; collectively we are running 10 games (eight under our club name, and two others that are individually listed).  If you're going to be at the convention, feel free to drop bye (and I still have room for one more player for my Friday night CBW game: come and get it!).

A SPOT OF PAINTING
I've completed another contingent (Ottomans) for my Balkans/Russo Turkish War One Hour Skirmish collection. I'll have a more detailed posting on these later. 


COMPUTER WOES AND CBW RULES UPDATE


I'm not sure if I have mentioned this, but in mid February my hard drive gave up the ghost. Fortunately, I had backed up just before then (a so called "files and folders" backup), so didn't lose much  (an updated One Hour Skirmish player reference and squad roster, which I'll have to redo: happily, the pdfs were both posted on my resource page, but I've lost the original MS Word versions for my own use). Fortunately, my system was dual drive: so the system drive was still intact and I was able to keep functioning. At the end of March, I took possession of my new PC and spent many hours of my life that I'll never get back configuring it, reloading APPS (we used to call them "programs"), passwords, accounts, blah, blah, blah.

And then I reloaded all of my backed up files and folders....only I just now realized that I had done so from an earlier backup and not the most recent one. So, now I must go back in and reload all my files and folders. Other than as a cautionary tale, you might be wondering why I'm telling you this...
...Well, I had intended to do an update of the CBW rules reflecting the new Rally procedure prior to the Mayhem Convention (so that would will be Version 2: currently, Version 1 is posted). However, the convention is now less than a week off and the time I might have spent doing that will now be committed to scrubbing and reloading my files and folders (work before play, even for us retired folk--there are only so many hours in a day available after priorities are taken care of, naps and the wee dram here and there...).

So there you have it. A little bit of everything (or a lotta' nothing?). 
Excelsior!


Thursday, February 6, 2025

BALKAN BORDER FRACAS: ONE HOUR SKIRMISH (VARIANT) GAME


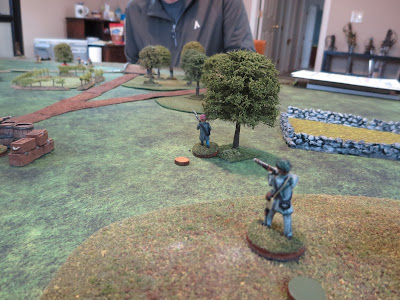
A Hungarian Chasseur (foreground) and a local Grenzer keep watch over a sector of the border with Romania amidst heightened tensions (in other words, situation normal).

Greetings, readers. Thankfully, I'm on the mend from the nasty business I posted about in my last communication. It was/is (technically) probably more of a case of nasty tendonitis (loosely known as "tennis elbow") than carpal tunnel, but nasty nevertheless.  Through a combination of splints, pads, and rest, I'm now on the other side of it and am returning to normal activities.  I've invested in some ergonomic upgrades to my computing area that will help in the long run as well.  But enough of that.  In the meantime, there has been some action, and in this return to the interwebs post I'll share a battle report of the playtest of my One Hour Skirmish Wargames (OHSKW) variant, Muskets to Rifles. For those familiar with the John Lambshead rules, this variant plays 90 percent like the original, with the main difference being the focus and a more discrete breakdown of firepower ability. You can find the rationale and explanation on the above-linked resource page. But now, on to the report (as usual, in this post you may clix pix for BIG PIX).
First, a bit about the tools. Above left, I made a 6" measuring stick marked off in 2" increments (the wood grain and the first black), with two, 1" increments at the end. Movement in OHSKW is in 6" segments, so this tool provided the means to handle almost all the actions in the game (except for longer ranged fire, for which we had tape measures).  A line of sight laser pointer for line of fire also came in handy, as well as the two dice to keep track of activation points. Finally, I got to bring out and use my custom cards (above right), which worked as expected (thankfully). 

The situation: a border region between Romanian and Hungary, some time in the latter part of the 19th Century. These were troubled areas, hence why most of these provinces had local paramilitary formations: specifically, Grenzers in this game (which, if you are up on your German, actually means "Borderers"--Grenze being "border"). In this particular region, which is a bit back from the actual border, there is a new telegraph station (the house at left). On guard in this sector are the assigned border forces (Grenzers with some Honved Chasseurs) with a small Honved (Hungarian Army) contingent in support. They set up to the left, with the Honved reinforcements coming in at the arrow in response to the first shots being fired.  To the right, the Romanians are coming to take down the telegraph station: in other words, just another day a Balkan Frontier region. They can enter anywhere within 2" of the edge of the table as outlined above. 

The Hungarians:
Starting on the table, four Grenzers (left) and two Chassuers (right). The Grenzers have the "Scout" capability (harder to hit in cover and able to move through terrain), and the Chasseurs have extended range (able to shoot an additional 6").
Off table is a contingent of Honved infantry: three riflemen (left) and the Hungarian leader (right). The all are standard infantry (level 2 shooters with class B rifles in my variant). The leader is a Level 2 leader with the "Inspiring" capability. 

All in all the Hungarians have 10 figures and a wide sector to cover, starting with only six figures on the table, but the advantage of defense. Their task is to safeguard the telegraph station.

The Romanians:
The Romanian raid had two specialist attachments: two Romanian Chasseurs (left) with the "Dead Shot" capability, and two Romanian Dorobanti Militia (right), paramilitaries from the adjacent region--the later had lower firepower (with outdated needle guns: level 3 shooters with Class 3 rifles), but with the "Scout" capability, being familiar with the region.  
 
The main body of the Romanian raid was on loan from the Tsar: a contingent of the Bulgarian Legion (left), seven riflemen strong, rated as average infantry, like their Honved adversaries, led by a Level 2 leader (right) who had the "Tough" capability.  

The Romanians outnumber the Hungarians 12 to 10. You will notice two powder casks in the picture with the Bulgarian legion. Each can be carried by one figure. Placing one of the casks against the wall of the telegraph station, using three action points to do so, and then moving 6" away, signifies readying the charge and then igniting the powder trail: blowing up the station (ie, the Romanians win). Failing that, if the Romanians can actually storm the station and get inside, they would also win. The scene is now set...

I took up the cause of the Hungarian defenders for this game, and so set up first. Looking from left to right from the perspective of the Hungarian position, I set up a screen to watch the sector...
...Out on the extreme left was a grenzer on a hill watching the stream and flank approaches to the sector (he would soon move down into the cover of the rough ground). Next over was another grenzer stationed in the ruins of the old border station (the brown template) watching the old road and the ford.
...in the center, there was one grenzer posted in the telegraph house and one chassuer posted in the improvised position covering the road. On the extreme right, (on "lookout hill") one of the local grenzers was posted with the other chasseur (both would move off of this position as events unfolded). 

Mark D (of Mark D's Gaming Site) was my amiable opponent and played the Romanians.
Mark focused on a "right hand" hook, with a flanking force deployed along the right edge and the rest of the Bulgarians (plus the leader) along the base on the right side of the table (heading for the ford, ostensibly).  On his left (the center of the table) were the two deadshot chassuers coming up the main road...
...and advancing on his left were the two Dorobanti Militia, who would make use of their scouting ability to move through the woods--neither one of us anticipated the role these hardy fellows would take in the game.
Things started well for the Hungarians. One of my chasseurs plunked one of the Bulgarians right on the start line (who also happened to be carrying one of the powder casks, which caused another fig to waste a turn to pick up). Mark moved his flanking Bulgarians up against the stone wall of the field and put down a base of fire from here. They and the two defending grenzers in cover on the Hungarian left wound up exchanging fire for the game, negating each other (my grenzers got hit several times, but each time I managed to save them: in this game, a "hit" causes a figure to be "down"--at the end of the turn, you check each "downed" figure to see if he returns or is a casualty, which eliminates him. Eventually, one of my grenzers did become a casualty, but too late to alter the course of events). 

The Hungarian Honved arrive, heading to bolster the left against the weighted Romanian right wing. The disks are activation markers (flipped over from green to wood stained side to show activation).
The situation developing on the Romanian left. At the bottom of the picture, the Dorobanti militia have advanced through the woods. One of them has been "downed" (the red marker: when down, we put that by the figure. If the figure was a casualty, we pulled the figure and left the marker--to show the trail of casualties). 
The Romanian chasseurs take up position in the woods in the center...
...and their fire would make for a hot time in the Hungarian center. Here, one of the Hungarian chasseurs is "down". Obliging me to bring the other Chasseur off of lookout Hill to reinforce this key position. The Chasseur would later become a casualty. 
The game uses a challenge system, with cards as opposed to dice. This was a remarkable turn of events. Out on the Hungarian right, my grenzer takes up position behind a tree and pots one of the Dorobanti militia. I turn up a King (ie, thirteen points). In defense, Mark rolls another King--but my suit (spades) is higher than his (Clubs), and so the figure is downed.  We had the same thing then happen right after this, only reversed, out on the Hungarian left. Mark shot my grenzer with a King, and I rolled a lower suit King. So we pulled four kings in a row--how often would that happen?  You can see the custom cards at work here. The points and rank of the suits is what matters, and my cards foreground this information. They also are used for casualty determination, something else I include on them (at the bottom of each).  Back to the situation, this would be a short-lived success. One of the two Dorobanti would be a casualty, but it turned out that only one Dorobanti would be all that is needed...
The surviving Dorobanti assaulted the grenzer behind the tree and dispatched him in close combat (in OHSKW, figures that lose close combat are not first "downed" but are immediately casualties: ie, eliminiated). His position is marked with a casualty marker.  
With one Chasseur gone, and the other downed, I reinforced the road block with one of the Honved infantry. This didn't deter Mark, who sent this crazed militia man into an assault here, too...
...in the assault resolution, Mark pulled a Joker (!). This ends the player phase, so the assaulting figure is moved back 2" and we go to the end of the turn--during which my downed Chasseur became a casualty! Good thing I had moved that Honved rifleman there (or so I thought)...
...in the next round, Mark (the Romanians) got the initiative, and so he activated the mad Dorobanti twice in order to move him around the edge of the position and do a close assault vs the Honved rifleman--and took him out, too...
...following up from this, in the next round, the mad Dorobanti moved up to the building, and then went inside to assault the defending Grenzer. Unfortunately for the Hungarians  (ie, moi). the fire of the Chassers had "downed" the Grenzer in the building. A downed figure who is assaulted is automatically eliminated! This was getting serious!
I sent in the last of my Honved rifleman to retake the building...and in the ensuing close combat, he was turned into another red corpse marker...
I had to get the building back before the next turn and had only the Honved leader to do it, who probably was thinking, "Why do I have to do everything myself?" 
...and so he went in and met the same fate as all the others who crossed bayonets with this Dorobanti. The Romanians had taken the telegraph station: game over! 

To recap, here is the swath of the "Rampaging Romanian" who single-handed took out five figures (half the Hungarians) and stormed the objective!

The moral of the story: don't mess with the Dorobanti!

It was a good playtest that proofed the variant.  As far as the game itself, this was my first run through, and we found that we had goofed up on a few points (mainly that we weren't resetting the figures until after the turn end: so we had a few rounds where all the figs had ended their activations by shooting, and we would just take turns rolling cards until a joker came up, after which we went on to side morale checks and casualty checks).  Despite this, we determined that it did not really advantage one side or the other or influence the flow of the game: lesson learned there for next time! I found that this system is ideally suited for the intended use of the single Chocolate Box Wars figs I have on hand (and also would work for more conventional sets, like my colonials). I intend to get more of these kinds of frontier forces on the table for future Balkan fracases!

Excelsior!
  

Related Posts Plugin for WordPress, Blogger...