Friday, November 25, 2022

AUSTRIANS V RUSSIANS CA 1879: BLOODY BIG BATTLES MEETS KRIEGSPIEL


In-progress scene of another installment of Half Scale Bloody Big Battles (BBB) played with Kriegspiel Blocks on a (1/2 scale) Kriegspiel Map (Koniggratz).

Greetings! In this post, dear reader, I will convey the tale of a recent speculative engagement between the Russian forces of Czar Nicholas II and the Austrian Forces of Emperor Franz Joseph I, circa 1879, in the wake of the Russo-Turkish War. But more on this context anon.  First, a few notes on the setup of the game.  As usual, in this blog post you may clix pix for BIG PIX.  
As with my previous outing, I returned to the Koniggratz Kriegspiel Map. As is my usual, I covered it with plexiglas and outlined selected contour lines and other terrain features to help players see the landscape. For more on this entire system, I would encourage the curious to visit my BBB Resources Page
Aside from flattening the mapsheets and providing a means for highlighting features, putting plexiglas over the playing area provides other benefits. In this case, (above left) I slipped status marker information and inch scales under the plexi, and also (above right), I put the turn record under it.  Speaking of which...
...post game, I improved the turn record track (new version pictured above).  This game was intended as a hybrid mini-campaign and battle, starting at 0800 on Day 01 and going through 1900 on Day 02, with a BBB night interval between. I came up with this turn record chart to support a game of this sort; it has two days broken into 1-hour turns plus a summary of the BBB night interval rules. You can  download a pdf of it here [Click] and also find it on the above mentioned BBB Resource Page.  Enough of the framework; on to the game.
There were a variety of scenarios that could have led the Russo Turkish War (1877-78) expanding into a clash between Russia and other major European powers, in particular Austria. In reality, Austria felt threatened enough by the incursion of Russian interests in the Balkans to invade Bosnia and Herzegovena in 1878. This scenario is a speculative clash between Austria and Russia.  Although it uses the Koniggratz Kriegspiel Map, it does so as a generic piece of terrain. The map is large enough to provide for a hybrid game, combining the elements of a campaign with a conventional battle game (or that was the idea...).
The key terrain in the region is the Koniggratz-Kleinitz Highway (in red above). This is the only road that provides the BBB double move (provided the formation using it is in road column, per my variant: see the BBB Resources page for more). It also represents a main supply line (MSR) and axis of advance in the region; and so  in this scenario, opposing forces are marching along it from opposite directions and stumble into each other. The complete scenario can be reviewed here [Click] and is also posted on the BBB Resource page. 
The victory conditions were designed along the principles of warfare and closely mimics the principles of territorial control reflected in GO  (the Chinese version of Chess).  Other salient principles of war at work are security, objective, maneuver, and economy of force. In short, this is a meeting engagement/movement to contact, with each side is trying to gain advantage by penetrating as far as possible into the enemy territory along the key axis, controlling as much of the field as possible, and safeguarding their own base. In so doing, of course, they will run into the opposing force, who is trying to do the same thing. Engaging, pushing back, and destroying the enemy is part of the operation, but so, too is preserving the strength of the friendly force: how hard to you push vs where and when do you maneuver? Where is it worth risking an engagement? The fact that this is a two day scenario gives more options for developing the situation.

For the Russian order of battle (above left), I referred to the excellent War in the East (Quintin Barry) and then sampled the Russo Turkish War Russian OOBs in the BBB European Battles scenario book to get a handle on translating units to game terms. The Russian structure was pretty standard: a corps consisting of two infantry divisions, each of two brigades of two infantry regiments (3 battalions each), plus a corps cavalry division. Often at the "Army" level there was an independent rifle brigade of several battalions. Finding information on Austrian operational structure, post 1866, pre 1914, however, was much more challenging. Happily, I ran across a web page on the Way Back Machine (which unfortunately I cannot conjure up again) that provided a complete OOB for the Austrian forces in Bosnia and Herzegovina in 1881.  The Austrian divisional structure mirrored the Russian: two brigades of two infantry regiments, each of 3 battalions.  The major difference between the two being that each Austrian brigade had its own jager battalion.  To make an (already) long story short, I decided that I would use the brigade as the base element (with two per division), each of 5 Stands. [Aside: I don't do a mathematical translation of numbers of men or guns to a stand; as long as values for the sides are relative to one another, then it really doesn't matter; I work them up based on how they play from there]. There would be two divisions per corps, each with a divisional artillery battery, and two corps per side, plus a corps cavalry division.  I assumed a four battalion Rifle Brigade for the Russians and represented it by assigning an "S" to four of the Russian brigades (the first of each division). The Austrian brigades each had an inherent "S" for the assigned jagers. To make up for this, I made the Russian cavalry divisions 3 Stands as opposed to 2. All are Trained (Tr) and all infantry are armed with Early Breech Loaders (EB). I probably should have made them all Tactically inept, but thought that this would have had too drastic an impact on game play: I wanted units to have a bit more survivability given the relatively low unit count.  
The Russian starting position, entering from the Northwest corner of the board with the lead corps (I) deployed and the follow on corps (II) on the road. 
A closeup view of the formations. (Above left) the Russian I Corps, with the 1st division on the left and the 2nd on the right. The Corps cavalry division is out ahead. I produced the standing labels with unit information, one per division, as well as the counters, which are color coded by corps (light green, I Corps, Yellow, II Corps) with the division and brigade numbers on them (1-1 would be the first division, first brigade, 1-2 would first division, second brigade, etc).  Each corps also had a HQ (the circular marker).
Given that all units were the same, it turned out that the labels were extraneous and the players set them aside and only used the markers plus their rosters.  This made for a much cleaner table, too. Above, the Russian I Corps, with 1st Division on the left and 2nd on the right. Given that all guns were RA, there was no need to mark them as such. 

The Austrian starting position, much like the Russian, only coming in from the opposite corner (the Southeast). 
Closeup of the Austrian commands, I Corps leading (above left) with II Corps coming up the road (above right). 
Equal time: Austrian I Corps in the lead, with counters only. 
Team Beard (above left) would advance the cause of the Dual Monarchy, with Mike C (standing) commanding the Austrian I Corps and Byron (seated) bringing up the II Corps. Opposing them (above right) would be the bald-faced duo of AJ (green shirt) and George (blue shirt), advancing the pan-slavic cause, with AJ commanding the Russian I Corps and George the II Corps. 
Opening moves. The Russians moved first, sending I Corps up the main highway, causing something of a traffic jam: General Dice was not with AJ in this game, starting out with several bad movement rolls that hampered his momentum. Meanwhile, George leads the Russian II Corps on a wide flanking march to the south.  On the Austrian side, Mike brings I Corps forward and begins to deploy...
...while Byron begins to march the follow on Austrian II Corps to the North.
The view from behind the Austrian position. The Austrian I Corps has come online to meet the advancing Russian I Corps on the highway. Meanwhile, the march of the Austiran II Corps is not going smoothly, with the 2nd Division lagging (due to bad movement rolls).  The Russian II Corps is beginning to make an ominous turn towards the Austrian left flank.  The classic "pinwheel of death" seems to be developing, with the Russians going for the Austrian left while the Austrians are going for the Russian left...
...everyone gets stuck in.  The lead brigades of the Russian I Corps get hammered as they find themselves trying to deploy in the face of a division of the Austrian I Corps backed by artillery at the top of the ridge (yellow cubes are disorders, blue are spent, black are low ammo).  General Dice was also with Mike and the Austrian I Corps here; he almost never missed! (and AJ, on the other hand, was continuing his run of crummy dice, which didn't help the plight of the Russian I Corps). The Austrian II Corps is starting to move up into the line to put more pressure on the Russian left flank. So far, the two Russian Corps have been isolated from each other, with the I Corps bearing the brunt of the action...
...but George has finally brought the Russian II Corps around. In a spectacular turn of events, the 1st Brigade of the Russian 1st Division catches the left most Austrian brigade in the flank, assaults it, and gets a +7 result (the maximum, for anyone not familiar with BBB), sending the Austrian brigade back spent and allowing the Russian brigade to following with an exploitation assault into the next Austrian brigade, which it also bowls back (although not as decisively)! Suddenly, the Austrian I Corps is in peril, as is the security of the Highway...
...The Austrian response. Taking advantage of the low ammo and disorganized status of AJ's battered Russian I Corps elements, Byron pushes the Austrian II Corps right wing brigade forward to the assault, pushing the Russian brigade back. Meanwhile, back with the Austrian I Corps, Mike sends the Austrian I Corps cavalry division, supported by the fire of a battery, against the Russian cavalry division, pushing it back despite the 2:3 odds and thus covering the highway (for now)--and he manages to consolidate the line to face the looming threat from the Russian II Corps to the left. The push from the Russian I Corps to his front has been mainly spent. 
A snapshot of the markers on a section of the field shows that the day's fighting was taking its toll on many of the formations and that momentum was being expended (blue markers are spent divisions, yellow are disrupted, and black are low on ammo). As we completed the 1800 turn of Day 01, time had run out and we called it a game, with the result being inconclusive. It would have been interesting, indeed, to have been able to proceed to the night interval, recover stands, reposition of units, and then see what Day 02 would have brought! 

Despite the fact that we did not proceed to a second day, we all thought that the hybrid map/mini campaign game worked out well. It still provided a depth of maneuver not found in most mini games, and the decisions involved with marching and maneuvering formations across the battlefield were as much a part of the game as the conventional components of rolling dice and picking off stands, which was not lacking.  However, the results of the latter had more context given the larger picture involved.  I had imagined that the first day would have involved more maneuver than combat, and so might have gone faster, but that's just not how this particular game developed. Nobody saw that as a knock on the concept, though. 
Regardless, it  was a grand day of gaming, in particular since it was another day time affair among we happy pensioners (except for AJ, who had the day off).  We played, lunched, played, and then talked about playing again!  

Excelsior!

Saturday, November 12, 2022

Battle of Schleswig, 23 April 1848, 1st Schleswig-Holstein War: Game Report


Danish infantry standing like a rock against an advancing stream of Prussian infantry in our recent game.  

Greetings, dear readers.  Before I move on, I feel obliged to include a small explanation (apology?) for my recent absence from the comments section of the circle of bloggists that I generally visit (you know who you are, I think).  Life has been busy lately (in a routine way: nothing drastic), and other things have simply taken up the time and energy available. I hope to get back on track in the next few weeks and return to form. Now, on to the topic du jour: toy soldiers!

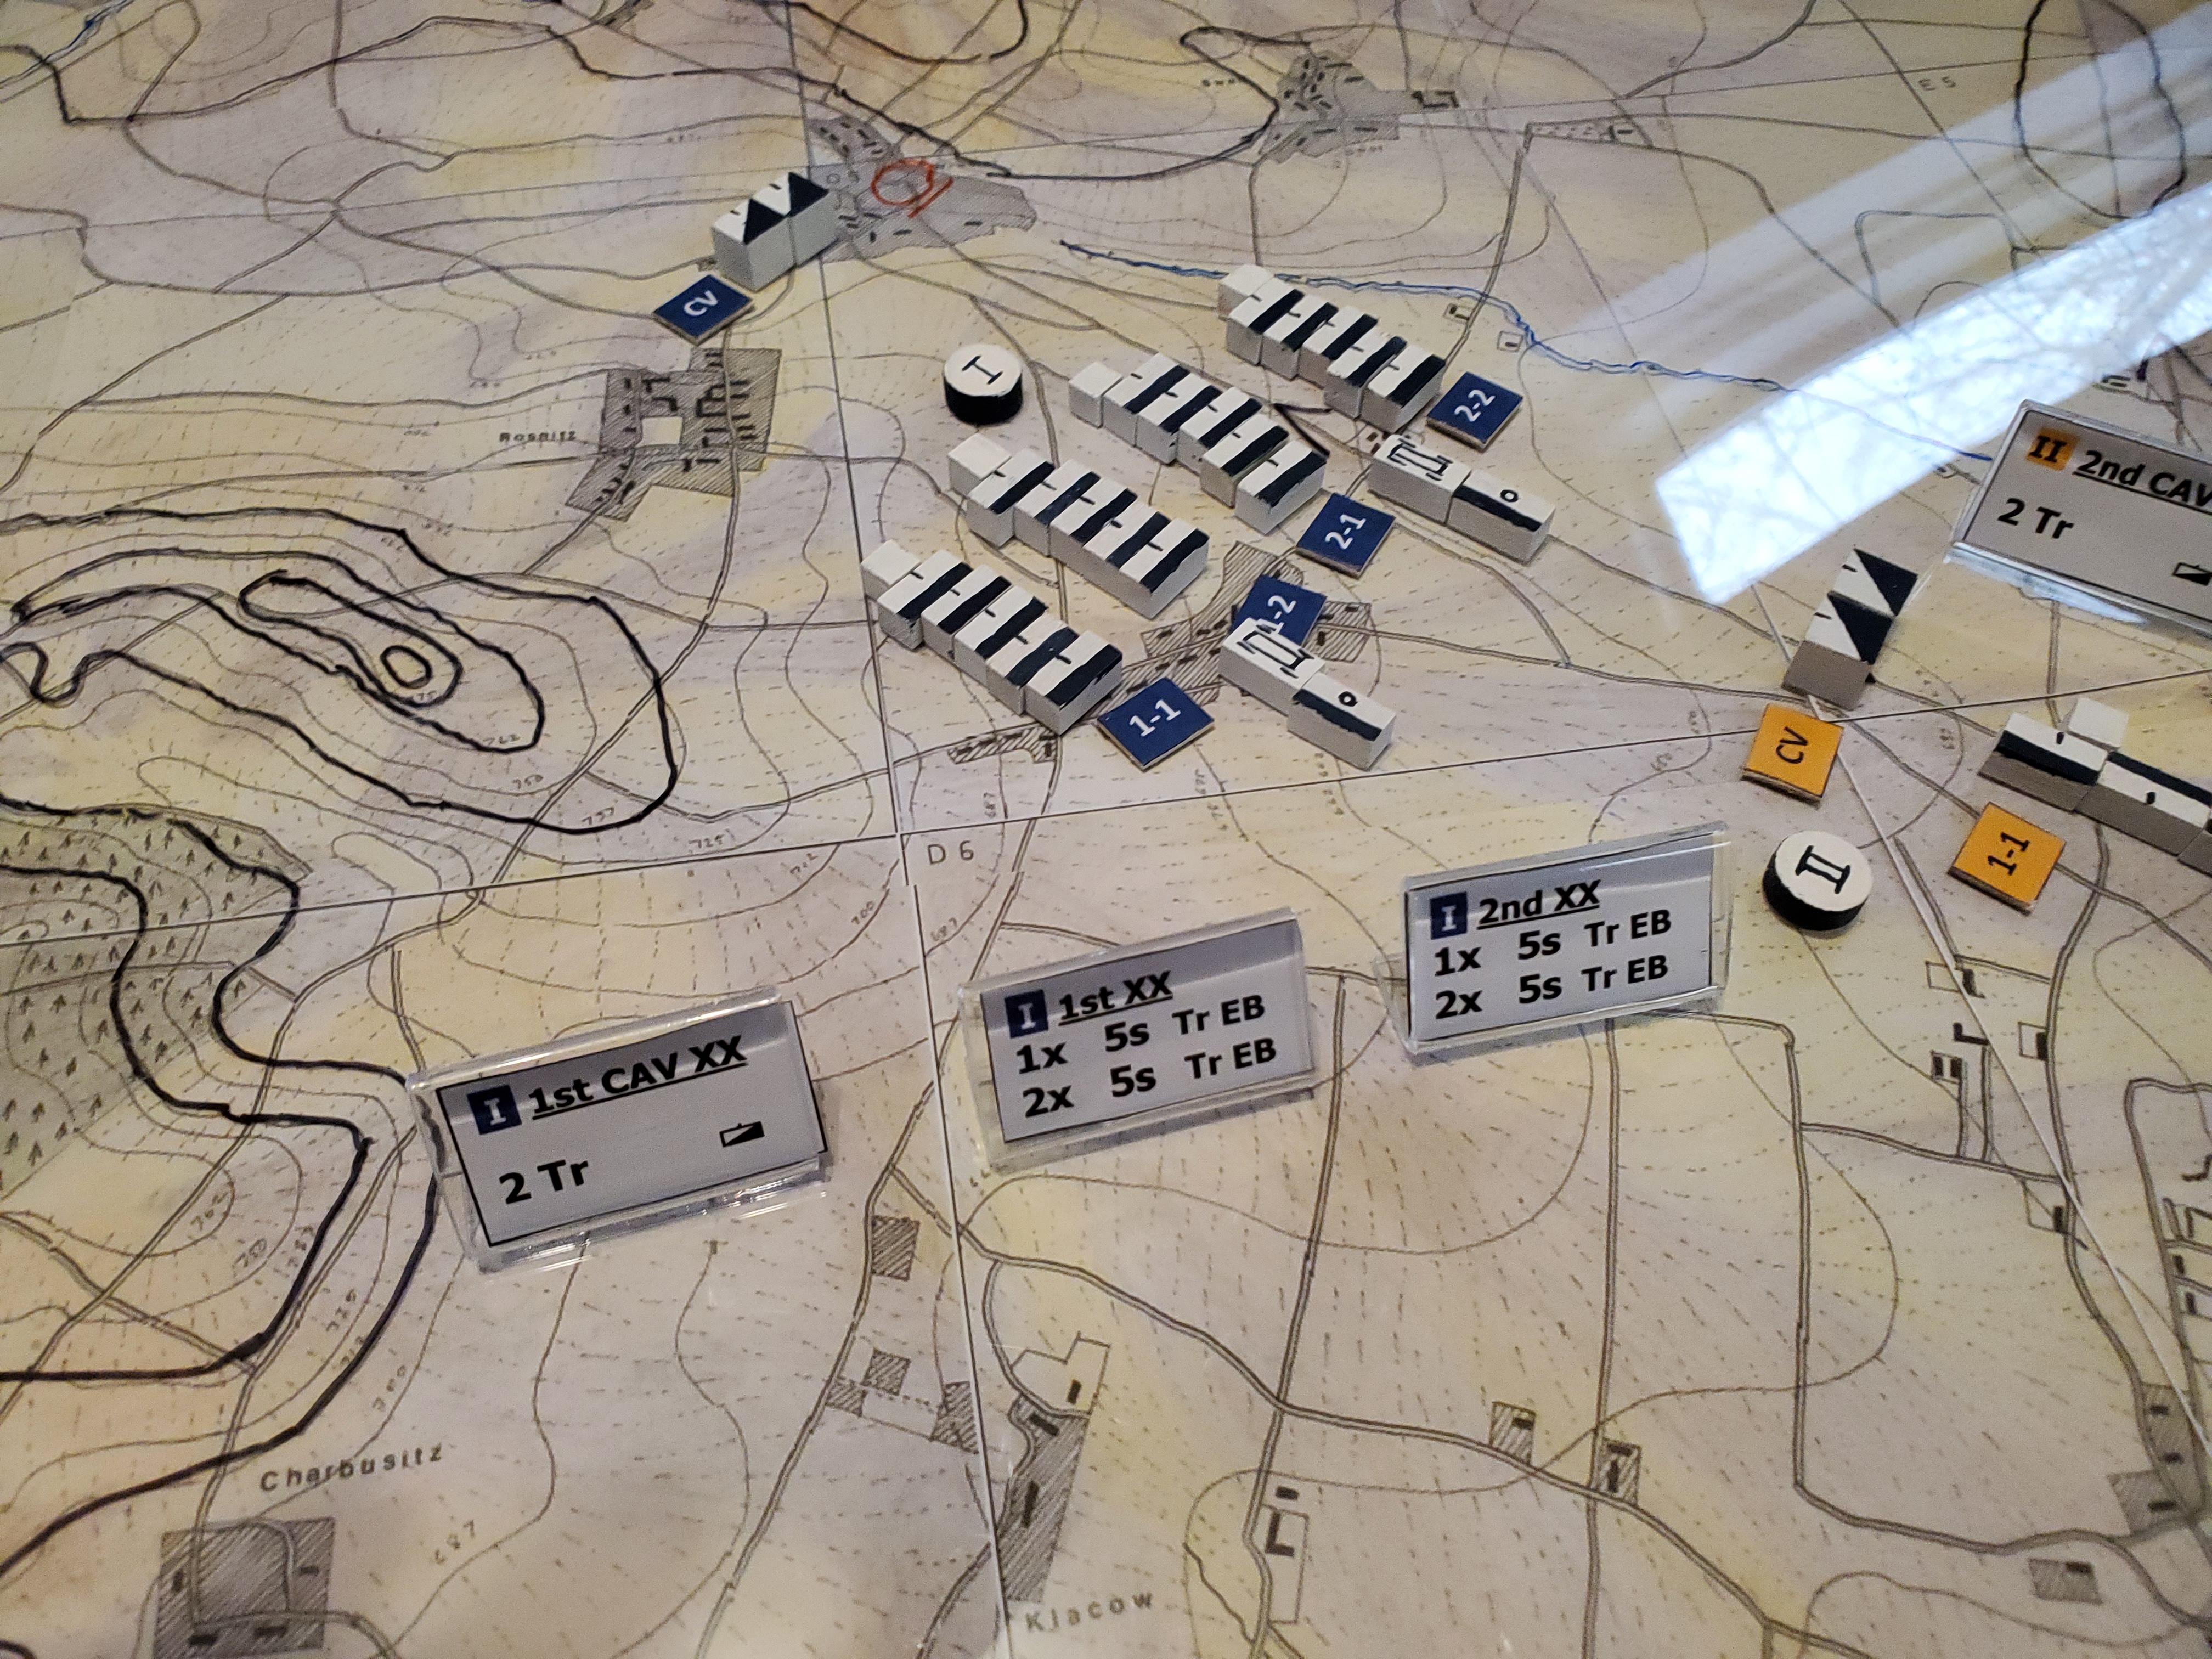
I wanted run a game using my Post Napoleonic battalion-level VNB Variant, incorporating lessons learned from the Austro Prussian Frontier Battle game.  Originally, I had intended to reprise that scenario with the same players and compare results. In the end, however, the players were not available, which caused me to start tinkering with the scenario. This, in turn, caused me to dump the Austro-Prussians and pull my Danes out of their boxes for a First Schleswig-Holstein War game--this being a much superior conflict to game than the second S-H War, in my humble opinion (see the opening paragraphs of my Battle of Dybbol post for more on this).  I based this game on the Battle of Schleswig, 23 April 1848. Briefly stated, in this battle, the Prussians were advancing north into Denmark and the Danes were holding a line near the aforementioned town (north of the Danewerks). When the Prussians approached, the Danes reacted, and something of a meeting engagement ensued. The Danes fought the Prussians to a standstill, even counterattacking at one point. Eventually, with the arrival of the German Confederation Division at the end of the day, the Danes withdrew in good order.  In this post, as usual, you may clix pix for BIG PIX.
The situation: the Prussians come from the left of the picture (South) and the Danes from the right (North).  The discs on the table (circled) are objectives: Black for Prussian and Blue for Danish. To control an objective, a side must have a unit within 6" of it with no opposing units within 6" of it. The Prussians win by controlling any two black objectives at the conclusion of a Danish turn, and the Danes win by controlling any one blue objective at the conclusion of a Prussian turn.  Any other result would be inconclusive.  The scenario can be reviewed and downloaded in pdf. 


Nearly all forces start on the table.  The Prussian reinforcements roll to arrive, automatically appearing after turn 4. The Danish reserve comes onto the table at turn 2. 
The view from the Prussian side at start...
The view from the Danish side. 

The dynamic in this game is that both sides need to both cover enemy objectives in their own zones and also seek a breakthrough to seize objective(s) in the enemy zone (1 in the case of the Danes and 2 for the Prussians).  The game is afoot: on to the battle!

The Prussian and Danish Commanders and their chiefs of staff survey the situation. In this game, there are no subordinate commanders. Both leaders are army level and can influence all units. The Danes have 3 command points (2 for the Army commander and 1 for the Chief of Staff) and the Prussians 4 (2 and 2).  Command points are explained in the scenario notes. In this game, I took the part of the Prussians and George took up the Danish cause (George had played in the Frontier Battle Game on the Prussian side). 
The Danish Advance Guard in their starting positions...
...opposed by the Prussian Vanguard on this wing.
In the center, the Danish 2nd Brigade lined up in its starting position...
...opposite the Prussian 1st and 2nd Line Brigades in the Prussian center.
On the right end of the line, the Danish 1st Brigade prepares for action...
...potentially to face the Prussian Reinforcements, which will arrive on the Prussian left (variable arrival). 
The battle begins: on the east flank, the Danish Chasseur battalion shakes out into 2 half battalions and advances with the rest of the Advance guard towards the buildings (in this game the buildings were null terrain: they block movement, line of sight and fire--and cannot be occupied. In effect,  you fight between them and not in them, creating a "street fight" sort of game in the lanes)...
...the Danish Advance Guard and the Prussian Vanguard collide in the confined spaces between buildings and the water features on this wing, neither being able to effectively deploy. The ensuing engagement resulted in a series of head on blows, with both sides taking losses without gaining advantage. 
Meanwhile, in the center, George concentrates the battery and half battery of the 1st and 2nd Danish brigades, creating a mini grand battery...  
...and the Prussians push forward, with the 1st Line making for the hill and the 2nd obliged to swing left to meet the Danish 1st Brigade, which George had marched around on a flank march.  To hold off this Danish flanking action, the Prussian 2nd Line would to be forced to take up a position in the line of fire of those Danish guns, taking punishment from both the Danish 1st Brigade and the artillery. It would become something of a race against time as the Prussian 2nd Line stood and got steadily worn down by the fire of the guns and the Danish 1st Brigade, both sides watching for the Prussian reinforcements.  Would they arrive before the Prussian line cracked? Remember, the Danes only need to control one blue objective to win, and you can see in the above picture how close the Danes were to those on this flank...
...at the same time, George pushed the Danish 2nd Brigade over the hill, colliding with the Prussian 1st Line. It was clear (even to me) at this point that the Danes were making an all out effort to seize the advantage before the Prussian reinforcements could influence the battle. Fortunately, I had just managed to deploy the Prussians into line,  and so was able to fend off the assault (with the help of General Dice: it wasn't a sure thing). The Prussian First Line here would eventually go on the attack and send the Danish 2nd Brigade packing (except for the Dragoons). For a brief moment, it looked like the Prussians could follow up onto the vacant hill where the Danish 2nd Brigade had been and threaten the objective there...
...but the Danish Reserves came up just at that moment to plug the gap!
After its heavy engagement with the Danish 2nd Brigade and the initial exchange with the Danish Reserve battalion, the Prussian First Line was 1 Strength Point short of wavering, and so I pulled it down out of the line of fire to the base of the hill to reorganize and hold, letting the artillery do some work...
...the Prussian 1st Line was all but spent, but still viable enough to defend. It would be good for one more assault, but would probably be wavering after that. It would take more than this  to clear the concentrated Danish cavalry and artillery units, not to speak of the reduced Reserve infantry battalion, away from the objective here. But on the other hand, neither could the Danes afford to crash any of these into the Prussian First line to try and get to their objective: and off screen, there is a squadron of Prussian hussars that would need to be pushed away. 
Meanwhile, on the south end of the battle, where the Prussian Vanguard and the Danish Advance Guard were having it out, things had reached stalemate. Each side had pressed and taken its lumps. With the initial attacks being met on each side, both pulled back to secure this flank rather than risk another assault that would spell disaster by sending the single command, with no reserve, over the edge. The Prussians in particular had to make sure this didn't happen since they could lose the battle here given that it would only take the Danes moving to the one objective to win. So, the battle had developed into a nervous stalemate here and in the center.  Meanwhile, on the Prussian left/Danish right, the Prussian 2nd Line was being steadily ground down in front of the Danish guns in front of the looming Danish 1st Brigade...
...but the Prussian Reserves had finally arrived...
...under the gaze of the Prussian High Command, the lead battalion of the Prussian Reserve comes up and ties in with the end of the 2nd Line and extending the Prussian battle line...

...the arrival of the Prussian Reserve signaled the end of  the Danish flanking bid. Realizing this, George repositions the Danish 1st Brigade to face the new threat...
...pulling a disorganized battalion out of the line to recover and forming the other two battalions into an L shaped line anchored on a building...
...the newly arrived Prussians cuirassiers and one infantry battalion seize the moment and hurl themselves against the Danish battalion at the end of the line: if they win this fight, they'll roll up the position!  However, this is not 1813--it is 1848-and the Danish line is not dismayed by the approach of the horse, and calmly holds its ground repulsing both the infantry and the horse (Actually, I rolled a double failed pre melee morale for both of these units, and they in turn then got thumped in the subsequent melee: it would have been a near run thing, anyway--quite dramatic, nevertheless!). 
Even with the successful stand of the Danish 1st Brigade defensive line, the situation had now become grim for the Danes. The 2nd Brigade was gone and the First Brigade had reached its waver point. An ad hoc group of units from the reserve and 2nd Brigade survivors held the center. The Prussian Reinforcing Brigade was relatively fresh and poised to advance and threaten the gun line from the flank with the support of the 2nd Line, which had been engaged but still had enough fight in it to push the wavering Danish 1st Brigade back. We called the game at this point, determining that the Danes would not be able to fend off the Prussians. They would be able to withdraw using their intact Advance Guard to cover the retreat. 
It was a rousing good game and a near run fight.  And most of all, I was happy to get my Danes out of their boxes and onto the table again. Being the first of my "Chocolate Box Armies" they hold a special place in my Post-Napoleonic establishment.  Both George and I liked the feel of this game.  In short, a good time!

Excelsior!

Related Posts Plugin for WordPress, Blogger...