Tuesday, April 26, 2022

NAPOLEONICS, MAXIMILLIAN ADVENTURERS, AND PIRATES: APRIL GAME NIGHT


April Game Night, with the Usual Suspects at play in three games.  Off to the left (partially out of picture) Napoleonics; in the center, Pirates; and off to the right in the corner, Maximillian Adventure.

Life has interrupted art recently--meaning that although there has been hobby activity the time and energy available for blogging about it has been more limited. Thus, there is a happy (albeit modest) backlog of things to post about, which I hope to get to in the near future (now that the garage has been cleared out and reorganized...). So, to begin, in this post, dear readers, I will give a light report on our club's April Game night.  We started up our regular monthly meetings in the fall--a welcome return to "normal"--although my own attendance at game nights until how has been light (for a variety of reasons), hence the lack of "game night" posts (for anyone who keeping track--not very likely).   

An administrative note: I have been concerned about the small font size of my blog posts, and am experimenting with a slightly larger font in this one.  I'm using the same font (Georgia), but in the "Medium" font size as opposed to "Normal" (which was the previous size--which appears quite small to my eye, despite it's name).  I am a bit concerned that the smaller font actually fits my wordy style better, and that the "medium" font size (used here) may cause a wall of text to crowd out images.  Any feedback would be appreciated on the reading experience (and whether it really matters: was the previous font size even an issue for anyone?).  And, as usual, In this post, as usual, you may clix pix for BIG PIX.

NAPOLEONICS
Charlie (standing) hosted a Peninsular French v Spanish Napoleonics game using his rules set, Napoleon's Rules of War
The game featured the usual display of Napoleonic goodness in 28mm.  I didn't pay much attention to what was going on other than to catch a few snaps, but I believe that the French prevailed--and Charlie's rules, which he has been developing and revising and are now in their second edition, have held up to yet another outing. 

MAXIMILLIAN ADVENTURE
Byron (baseball cap) brought out an old favorite, a The Sword and the Flame game set in the Maximillian Adventure using  figures that were passed down to him from Mark Stevens, a lifelong friend of his who had sadly passed away several years ago. Mark did not live in our area, but he would host these TSATF games at Historicon for club members, who have many fond memories of them..
The figures may be vintage (I believe mainly old Foundry), but the painting and presentation remain state of the art. This was quite a lively game, and reports are that the four players had quite a romp--like many TSATF games tend to turn out--and the game lived up to expectations.

PIRATES!
I participated in the third game: Pirates!  Mike B (not pictured) ran this one, which was set on a 12'x6' table. Many of us in the club have our own pirate ships and crews (from a previous game day), and we were able to use these in this game, which was one of the attractions (Mike also had ships and crews available for anyone who did not have one, but that wasn't the case--we were all self-sufficient buccaneers, arrrgh!). He had a simple set of sailing (and boarding!) rules that worked very well (once we got the hang of them).
"Red Sails in the Sunset..." I and my eager crew of likely lads set sail for adventure in my very own Pirate sloop, the Blanche Dubios sporting her distinctive red sails. Readers of a certain vintage may find the illustration on the (appropriately) split-tailed banner familiar.  Yes, it's a man's life at sea..."Men, men, men, a ship full of men".
(Left) Dr Dick reaches for trouble while the pirate-bearded Phil looks on. (Right) Canny Pirate Phil's vessel lurking in the corner early in the game.
It was an "every pirate for 'imself" sort of game (what else?), with a merchant ship in our midst to fight over for a prize.
(Left) Dr Dick delivers a cowardly stern rake to the courageous Blanche Dubios. (Right) No matter: the Blanche Dubios and her fine crew boldly board the merchant ship right from under the noses the lesser pirates...
...who would then turn all their attention on the Meanderer and his prize crew aboard the merchantman to try and keep her from making port and cashing in. But in vain.  The crew got wiped out by a final blast of grape, leaving the captain as the sole survivor just as it pulled in to port (quite a finish!).  This was the best of all possible results, of course, for a pirate Cap'n; I'll miss the lads, but then again, there'll be no need to split the booty!  
And speaking of booty, at the end of the evening, I had hauled in the most doubloons and so came away "Top Pirate" (arrrgh!). 

Excelsior!

Wednesday, April 6, 2022

FRONTIER BATTLE, 1866: GAME REPORT


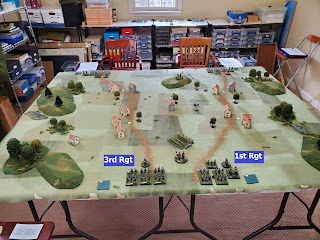
An 1866 clash brewing.

Recently, I hosted a game set in the 1866 Austro-Prussian (Seven Weeks') War.  The scenario was generic, but loosely based on the frontier battles (such as Nachod and Trateneau) where a leading element of a Prussian column passed through a mountain pass and was met by an Austrian force attempting to push them back.  What makes these engagements attractive is that they are meeting engagements (as we would call them today), with both sides coming at one another as opposed "attack and defend" situations where one side sits and the other bashes its head against them.  These were also "pocket"  battles of essentially division on division building to corps sized. In other words, these engagements are nicely tailored for the "Battalion" scale of my multi-stand VnB 19th Century variant, which I wanted to take out for another spin--and in particular to test out my "1866 supplement" for the same.  I also just wanted to see my Austrians and Prussians on the table (that matters, don't it?).  In this report, you may clix pix for BIG PIX as usual.  
The situation: The Prussians (right) are emerging from a mountain pass into Bohemia and trying to move into open territory, while the Austrians (left) are converging on them from the South in an attempt to push them back.  The set-on had two lead regiments for each side starting on the table. Victory would go to the side that controlled three of the towns (double circled in blue/yellow on the map); there was also a sudden death victory condition if one side captured the objective in the yellow (Austrian) or blue (Prussian) triangle.  As a kicker, if a turn ended where one side had a unit within 12" of the white squared house and the other did not, this would represent control of the center: the side with the unit within 12" would gain a command point representing this positional advantage.  This set of objectives would provide multiple ways for each side to approach the game and also encourage active play across the table (and so it did). I should add that in this scenario, I used the houses as "null" or "blocking terrain"--in other words, buildings cannot be moved into or through and they block line of sight and fire. This worked well at this level: it rendered a town fight sort of feel with units fighting among and around the buildings, but avoiding the complication of occupying and fighting in them. 
The game is a divisional clash, with two brigades (reinforced) on each side.  The Prussian force (above left) represents the lead division of the approaching column and the Austrian (above right) roughly the equivalent (of four brigades: although the Austrians did not have divisional organizations).  The follow on regiment of each brigade entered on turn 2. Each side could also call up a reserve cavalry brigade to add to the mix (but at the cost of a command point).  This was a four player game, so each player commanded a brigade: a nice level, I think.  For the curious, here is a pdf of the scenario. It is also posted on my 19th Cent page (this is a Volley and Bayonet variant). 
The Austrian lead regiments at start, each of 3 line battalions with a hussar squadron and a jager half battalion assigned. 
The Austrian High Command assessing the opposition. 
The Austrian 2nd Brigade Commander at the head of his lead regiment, chafing to throw the Prussians back. 
In my 1866 variant, the Austrians line infantry (not the grenzers or jagers) are more effective when at full strength (Category II) and have a morale bonus when attacking, but they drop to Category I once they sustain a casualty. This represents the "strosstacktic" and gives them a chance to close (it offsets if the morale negative when trying to close with CAT III infantry in line).  They also have extended range to reflect the lorenz rifle, but they are lower category infantry than the Prussians (who are category III), so they may have a small range advantage over the Prussians but their long range fire is less effective (and dropping to CAT I upon SP loss makes this difference even more pronounced).  The first SP loss for the Austrians also represents the loss of the 1/3 of each BN that was armed with the lorenz with adjustable sights vs the rest who had the iron sights: in other words, the first losses would strip away the "third line" men who were assigned to the firing lines, who were the more trained (relatively speaking). The bottom line is that the Austrians line infantry are most effective when used aggressively and at full strength--and they need to have successes early on before casualties start to degrade their capabilities. 
The Prussian lead regiments at start. The 3rd (left) is conventional, with 3 line battalions. The 1st (right) is a hybrid advanced guard configuration, with 2 line battalions, a jager half battalion, and an uhlan squadron (this is a characteristic advance guard mix that the Prussians did employ in the campaign--albeit done in micro in this game).
The Prussian Division Commander and his trusty Prussian General Staff Liaison Officer appraising the situation. 
The Prussian 2nd Brigade Commander at the head of his lead regiment, keen to push
 south.

An overview of the 1st Regiment: Battalions are two stands. Half battalions (jager) are one stand. The uhlan squadron is a single stand unit (although cavalry has the option of being employed in 2 stand "regiments").  The markers on the stands are color coded by regiment (black in this case). Each represents a strength point. Shown to the right is the tracking system. Each regiment has a base like this, with a marker in the upper left showing the corresponding element and the waver level--in this case, 5. When a unit loses an SP, it is moved from the unit to tracking base. Once the number of SPs reaches the waver level, the regiment begins to make waver checks. There is one of these tracking stands on the table for each regiment: makes book-keeping very simple. The dice in the dice frames on the command stands represent command points. 
Command points are handy, and there are different options for Div/Army vs Brigade use: once used, they are expended. In this scenario, having control of the center will replenish command points (at 1 per turn). 

The game is afoot, with players taking up their positions and the game briefing done.
Early in the game; the lead regiments have advanced and each side has brought on their follow on regiments.
First clash: Prussian Uhlans of the Prussian 1st Brigade (handled by George) vs the Hussars of the Austrian 1st Brigade (handled by Mike). This fight would go to the Austrians, establishing a trend: General Dice was definitely with the Austrians this day. 
On the other side of the table, the Austrian 2nd Brigade (handled by Earl) about to collide with the Prussian 2nd Brigade (handled by John). As with the other side of the table, General Dice was wearing white this day: at one point, Earl tossed five 6's (out of six dice), wiping out a Prussian Bn at a swipe. Although it was a back and forth affair, these early successes did carry the Austrians to a narrow--albeit appropriately pyrrhic--victory.  

After this, I'm afraid that I got caught up on facilitating the game and don't have any more nice pictures of the action. 

The bloody-minded and victorious Austrian Command, Earl (left) and Mike (right).
The momentarily checked but still game Prussian Command, George (left) and John (right).

Thanks to the gents for playing up and playing the game.  I'll need to run another to better assess the 1866 module, but my initial impression is that it worked well.  This was, by the way, a daytime game: run on a Monday from 10:00 am (with a nice break for lunch) and then ending at around 2:00--it's good to be early retired!

Excelsior!


Related Posts Plugin for WordPress, Blogger...