Thursday, December 19, 2024

CHOCOLATE BOX WARS GAME AND UPDATE


The view from behind the Prussian line early in the game. 

For anyone following along, this post has an "important" update on the Chocolate Box Wars (CBW) rules system.  Last week, I ran a game (using the introductory scenario) to introduce friend and fellow club member Greg to the system.  Intro game aside, I also used this game to proof a slightly more permissive "move and fire" rule for field and light artillery. More on that after the game report. Speaking of which, I was busy facilitating the game, so the game report will be rather abbreviated. Scroll through to find the new rules note at the end of the post. As usual, you may clix pix for BIG PIX in this post. 
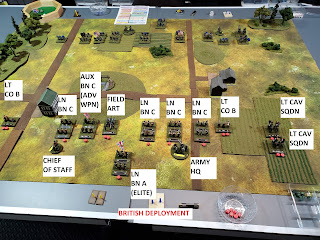
I took the game on the road to Greg's house and ran it in his war room. Sticking with the introductory scenario, I brought the Danes and the Prussians. Mike (left) took the Danes and Greg (right) took the Prussians. The initial setups, seen above, were very linear. I think this had something to do with the set on areas being 8 inches deep as opposed to 12 (Greg's table is 4 feet by 6, and so the set-on areas are in compliance with the standard rules, which assume a 4'x6' table).  My table is 5' x 6' and so the set on areas are 12" deep as opposed to 8"--interesting to see how that 4" difference influenced the set ups. 
Both sides advance: maneuver was basically straight ahead, with both sides advancing online and converging on each other in the center.  I think this was, in part, due to the nature of the game. Greg was more focused on the system than any "fancy footwork" so to speak, and Mike was happy to oblige by meeting him head on. 
There was a cavalry on cavalry engagement on the Prussian left/Danish right that was of a different flavor than the rest of the table. The Prussian dragoons (left) came up and sent the Danish Guard Hussar light cavalry squadron packing (Mike was obliged to "retire and reform" it to save it). Then the Danish dragoons (right) came up and started to trade blows. Both sides were very streaky here, missing more often than hitting, and so it was dragoon on dragoon action here until the end of the game. Speaking of which, we called it after about 3 hours; decision to the Danes (Mike). Things were going downhill for Greg (although still in the balance), but by that time we had achieved our ends: plenty of shooting and moving and Greg was introduced  to the system--and looking forward to playing the next game with a more complete understanding of the rules from the start. 

THE RULES MODIFICATION
Based on feedback and observations from games thus far, we thought that artillery move and fire was a bit too restrictive (although not "broken" by any means, ie still within the bounds of playability given its more generous field of fire).  So, in this game, I tried out a slightly more flexible version of move and fire for field and light artillery (note: there was no light artillery in the game, but the changes are to both types). 

Above, details of the player reference showing the changed "Move and Fire" for artillery.  In the original version, only horse artillery has a "move and fire" capability (above left).  In the modified version, the field and light artillery also have a "move and fire" capability (above right).  Specifically, the field artillery now may pivot (ie, change face) as a "move and fire" (before that, it would have been a "move": no fire).  And the light foot artillery now has a 2" "Move and Fire"--basically a modest prolong, but one that includes a facing change (as per normal movement rules). As has been mentioned, the artillery does have a more generous field of fire than infantry, and so can cover a good sector of the battle and not need to change facing (normally) just to engage units. However, this version allows more discrete use of artillery by facilitating the ability of a battery to change its primary line of fire (by changing facing) in order to target a specific unit, something that would have taken two activations in the prior version (one to move and the next to fire). 
    This more permissive version does come at the cost of fire effectiveness (moving fire is a -1, appropriate in this case since the artillery is technically shifting fire and not spending the entire step engaging the target).   This was in play during this playtest and it worked well. Players sometimes used artillery to fire on units according to the normal fire priority, but there were times when they felt they needed to intervene to shift fire to a specific target other than the one in the default priority of fire. It also sped up game play since players were not spending two APs and going through two different activations to accomplish this exercise. And (finally), this added capability did add a more depth to player decisions and made artillery more active than it had been in prior games, both seen as a positive steps. We'll probably play it this way in the future. 

Thumbnail of the front page of new player reference

I have produced a new player reference, numbered v24a, reflecting the new rules. To make it easier to discriminate between the two, the header on the new version has a white letters on a black background (the original has black letters on white). As I said, this is not a mandatory change: the original version works perfectly well--players now have options. I've added the new version to the CBW resource page as well.

Excelsior!


Saturday, December 14, 2024

ONE HOUR SKIRMISH WARGAMES: NEW RESOURCE PAGE


One Hour Skirmish Wargames (OHSKW) by John Lambshead

Greetings, dear readers (assuming that there is more than one). In yet another installment of "not being able to leave well enough alone" this post is to announce that I have created a variant of OHSKW--and have posted said variant and  materials on a new resource page (link below):

(There is also a tab at the top of this blog) 

Materials for download are available on the above referenced resource page. This post will provide a brief overview and an idea of the variant. I invite you to go to the resource page and review the variant pdf there to gain a complete understanding and to download other materials. 

General: This variant is not intended as a stand-alone, but as a supplement to the One Hour Skirmish Wargames (OHSKW) rules by John Lambshead, which the reader will need in order to play.  

Romanian Chasseurs
(Left) Danish Infantry; (Right) Hungarian Infantry

Romanian Dorobanti Infantry

Why? My primary interest with this rules system was post-Napoleonic (mainly continental) skirmish gaming. Specifically, for each of my  “Chocolate Box Wars” era armies, I've painted a handful of spare, singly mounted figures--a smattering of examples are above. I had no specific use in mind when doing these, and didn't do them in numbers for the usual skirmish level games, but figured that they would come in handy. You might say that they were figures in search of a purpose. Well, the small figure count of OHSKW fulfills that purpose: I look forward to putting them on the table now.  As such, this variant (and player ref) is tailored specifically for infantry only, and ending at around 1900 (avoiding the complications of machine guns, artillery, etc, etc). I also realized as I was making this variant that I could take it back beyond the primary target era all the way back to the early modern. However, I kept the variant title "Muskets to Rifles" as a simple point of reference and to indicate the primary focus. So, what have I made available?  First of all, there is a pdf explaining the variant at the top of the resource page (it's not worth a thumbnail here, but definitely worth a peruse if you are familiar with OHSKW and at all interested prior to looking over the player reference). 

Player Reference: As with most home supplements/variants, this one began with the production of a player reference for my own use.  Although it is intended for my variant, you could use it to play standard OHSKW provided you recognized the specific terminology involved in the variant.   The player reference is intended to be one-sided--all the in-game functions are on the front. The reverse has notes, optionals, and an explanation of the terrain. It can be downloaded on the Resource Page

Custom Card Deck: 
Rather than using a standard deck of playing cards, I produced a custom deck. It is  not variant-specific but can be used with standard OHSKW.  Above is a sample:  the actual card and suit is in the upper left. The rank of the suit is in the upper right (more stars = higher rank). The number the card is worth is in the center (for initiative, action points, combat and morale resolution) . Below the number is the casualty-check outcome. The two period soldier portraits are the jokers. You can download a pdf of this deck on the Resource Page. 

As a point of interest, I went Board Games Maker and had several decks of cards made. I'm quite happy with these results and will be looking to making use of this resource more in the future for other new projects and to replace the many home-made cards I use in other my games (that are getting a bit dog eared). 

Squad Roster Card:  Although it has columns specific to my variant, this could be used for standard OHSKW as well (just ignore the special columns that don't apply). Of course, if someone is interested in the variant, these will work perfectly (well, nothing is "perfect"). Available for download on the Resource Page. 

Enjoy! 
Excelsior!

Tuesday, November 26, 2024

LUNDY'S LANE, 1866: A CHOCOLATE BOX WARS BATTLE


A close up shot of Mark's British Intervention Force figures ready for action. 

Greetings, dear readers.  For those who have not yet grown tired of the topic, I have yet another report on a Chocolate Box Wars game.  This one was the second of a pair, following on the "match" game between Mark's Union army and my Russian RTW army in the last report.  This time I went to Mark's place and he hosted. Rather than a pure tournament style game, though, it would be a scenario.  Mark's focus is on the "New World." Among his "other" collections, he has an excellent 28mm War of 1812 collection.  Thus, in CBW he has put together a U.S. (Union) force and a "British Intervention" force. As usual, in this report, you may clix pix for BIG PIX (and I would recommend doing so to see Mark's excellent figures).
Above Left, the US (Union) army ready to be deployed. This would be its second time out after its victorious debut against my Russians in the last game.  Above Right, Mark's British Intervention Force, waiting to be deployed. 

Several special units among the British Force: (Above  Left) a contingent of Confederates equipped with advanced weapons (AW). Above Right, the "Ladies from Hell"--Highlanders-- would be the British elite line infantry (Morale A). 

The battlefield: Mark set up his War of 1812 Battle of Lundy's Lane terrain. We would use the deployment scheme in CBW from this point onwards. 
I should mention a word about terrain, specifically elevation, in CBW. Hills are treated as templates. Units uphill get "cover" from units firing from lower elevation.  To avoid complications, units are either completely on a hill (C), partially on a hill (B), or completely on zero elevation (A).  These are progressive. So a unit on elevations B and C would get cover benefit if fired on from a unit on elevation A. A unit on elevation C would get cover benefit if fired on from a unit on elevation B (think of the border of the hill template as a contour line). This major hill was the center of much action, and this simple but incremental terrain model was proofed and added much to the feel of the game. This hill position was a major challenge (as you will see). The buildings were for show (we moved them out of the way as needed)--the town templates themselves were the fixed terrain that mattered. 

Mark would take his British Interventionists, setting them up for their first battle. 
Above Left: I would take and set up the U.S. Union. Above Right: A long shot of the British Deployment. 
The disks behind the unit are Activation Point (AP) markers, ones that have been assigned to units at the start of the turn. There are others in the Command Pool that are issued from the HQs (which can go to any unit). At the start of every turn, every unit must be assigned one AP, ensuring that all units will be able to act every turn. Multiple APs allow more activations. If assigned to units, they are only for that unit. If in the command pool, they can be allocated to any unit (with varying effectiveness if too far from the HQ). 
The US/Union Deployment. The Iron Brigade served as the Elite Line Unit for the US. Rather than having an Advanced Weapon unit, the US had a Veteran Infantry unit (Morale B) in the Zouves. The cavalry on both sides was light, and I deployed mine as Squadrons rather than a single regiment. I also deployed my light infantry Battalion as Companies one on each wing. My intent was to weight my right in order to take the hill with 4 line battalions while holding the rest of the line with the Iron Brigade and Zouves--the idea being that given their quality, these troops would be able to hold off the British right wing until the attack went in. My artillery I would get onto the only high ground available to me and use it to support the operation with long range fires from there. So much for plans... 
Mark's British Deployment. His cavalry was also deployed by squadron, opposing mine. He split his light infantry companies, as I did, assigning one to each wing. He had two battalions plus his artillery poised to take up a strong position on the hill, with units within supporting distance available. This was going to be a fight!
Oh, perhaps the most important accessory on the table, the "Dice Gulag" was ready to receive under-performing randomizers. 
 Above Left, Mark had the high dice on the initiative roll, and so opened the ball, taking the "Active" side first. Above Right, first contact (and blood) went to my US light infantry on the right wing, hitting its counterpart for two hits. The AP markers had an "X" on their reverse. When spent, you flipped them over. In the above, you can see that my light infantry had two spent AP markers at that point, meaning that it had activated twice. The red cross markers are hits. Infantry stands take four hits to eliminate, artillery and light cavalry three. 

An overview of the initial phase of the action as the armies move towards one another. It was clear that Mark was going to make a stand on the hill, spotting his very dangerous Advanced Weapon infantry and his artillery there. 

A detail of the early action on the U.S. right (the main effort).  I made the mistake of deploying the center line battalion in line, which forced me to veer the left and right battalions away in order to advance. Not a major disaster, but a lesson learned in the management of larger formations. Mark's light infantry have occupied the town and dished out two hits to my light infantry, evening the score there. Mark, seeing me coming out on the wing, swings out his infantry battalion to cover the flank approach. Meanwhile, the left battalion of the main effort, suffering the long range (deadly) fire of the advanced weapons infantry and the artillery on the hill has lost a stand and been reduced having barely crossed the start line!
A detail of the early action from behind the US left/center. The Zouves have deployed and the Iron Brigade is making its way forward. The light company has faced off against the British light company, which has occupied the town. The artillery and the Zouves have inflicted hits on the lead British battalion, which Mark has pulled back to get out of the line of fire with the intent to later rally off the hits.
A detail of the left end of the US line. The cavalry squadrons would face off here and neutralize each other. My major concern here was to use my cavalry in a defensive, counter maneuvering fashion to protect my artillery. My light infantry company was also deployed with the intent of covering my artillery from any action coming from the town. There would be some minor cavalry skirmishing out here, and eventually my light infantry company would roll a stupid good result and take out the British infantry company in the town (which I would then occupy)...but that was late in the game. 
Speaking of dice, in this game, my dice rolling was insanely streaky. I would either roll a pack of 1s and 2s, or all 10s, 11s, and 12s (the game uses 12 sided dice).  Mark wisely limited the number of dice available to me, so rather than overflowing the Dice Gulag, I consigned my dice there for various "time outs" and then brought them back when I needed them. Mark, on the other hand, had incredibly bad luck with his rally rolls, although he was still adept at doing just enough at times to bring units back before they lost a stand. 
The Battle intensifies.  My main effort claws its way up the hill. I put three hits on the British battalion covering the British left, which Mark manages to get back on a "Retire and Reform" action, saving it (and keeping me from inflicting a fourth hit that would have killed a stand and reduced it). I keep on putting hits on the artillery, never killing it, but degrading its fire and forcing Mark to spend APs to rally it rather than fire.  Meanwhile, given the hammering that the left hand battalion in the attack had taken I have had to push another line battalion up, the one that was in the line to the right of the Iron Brigade, to continue the advance. Mark counters by swinging a battalion into a position on the flank of the artillery, delivering heavy supporting fire against my attack. Another of my attacking battalions is reduced. My center battalion on the hill has just managed to get into the cover on the hill (the cemetary), but it has three hits and is one away from being reduced! Mark has rallied off the hits on the battalion on his right, which is ready to come back into the line. My light company has managed to clear out the British light company from the town on the edge of the hill. The Crisis of the battle has arrived!  
Looking at the situation at that point from behind the British Right. Ignoring the incoming fire from the British line, which is inflicting hits on the Iron Brigade, my left wing infantry (Iron Brigade and Zouves) plus my artillery, all deliver desperate long range fire against the British battalion that is positioned to sweep my attacking units in front of the hill. They don't kill a stand, but they put multiple hits on it, degrading its ability to operate and reducing its fire effectiveness. Will I be able to continue this suppression, and will this be enough and sufficient to cover my advance? 
Meanwhile, back out on the right and on the hill, I manage to rally off the hits on my center battalion and push the reduced battalions up. With the expenditure of multiple APs to move, I manage to get my right wing battalion up onto the hill and flanking the Confederate Advanced Weapon battalion. My light infantry take the town. One of my reduced battalions on the hill is one hit from being eliminated. You will notice that all of the AP markers are "X" side up--this was a maximum effort maneuver. I have no more actions left, and the next turn would determine the results. (I'll also mention here that when I did then shoot, I rolled something like 12 to 15 dice without getting a hit: that streaky thing). So we rolled into another turn...

...and we then reset the turn again (Note the AP markers with no "X"s showing). Mark got the initiative, and was the active player...and then, a terrible noise erupted from behind the British line: the skirl of the pipes! The Highlanders, that Mark had positioned so well, were going into action!
They smartly swung to the left and headed straight for the Union infantry that I had so laboriously maneuvered on the flank... 
...and with two crashing volleys (a "move and fire" and a "fire") put four hits on them, taking them from a full strength battalion that was on the on the verge of sweeping all before them to a reduced battalion of one stand! 
The dead pile was now tipping against the U.S...what a scrap!
With a combination of key reactions during Mark's active phase, and surviving the punches delivered during the rest of the British initial activation, I switched to the active player myself, and had husbanded enough APs to still have some unit APs and a enough in the command pool to provide flexibility. And my dice got streaky hot again at just the right time. The fire from my reduced battalion and the full battalion in line on the hill, plus the light company, managed to take out the pesky Confederate Advanced Weapon battalion, unhinging the Brit position on the hill at last (although the Highlanders were still in a good position holding the new end of the British line).
But with the Iron Brigade and Zouves now deployed for maximum effect in line, I was able to advance and do multiple activations (the veteran and elite ratings make these more likely) and deliver a few good shots to take down the reduced British battalion that had been supporting the artillery, as well as the other British battalion that had been holding the right end of the British line. It was not without cost, however, as another of the U.S. infantry battalions on the hill had gotten wiped out. Nevertheless, this broke the back of the British force and the day went to the U.S.: Mark's Union force has (once again) come out on top.  

My convivial host, Mark. I certainly can't say that I "outplayed" him. This was a good fight that just happened to go my way this time around.  The lessons learned from this game are similar to the last: I mentioned having to be "bloody minded" to operate in this system (apropos of the era), and so it proved in this game. Mark made superb use of the elevation increments as I was being beaten about the head and shoulders as I clawed my way upwards on the hill position. I had learned from the last game and allocated more units to the main effort, but it turned out to almost not be enough, regardless. I still had to divert another unit into the meat grinder: at the end of the day, sending four battalions against the hill, two of which were reduced and one eliminated by the end of the game--and at several points had I not rallied off hits at critical points could have wound up worse. Looking back on the overall flow, it seems not unlike the Confederates attacking up Cemetary Hill at Gettysburg or any other number of assaults in the mid-19th Century. 
    This game also saw much more close range action than others. I was able to keep putting enough hits on some of Mark's key units to force him to rally rather than fire (particularly his artillery), and in turn, I had to expend resources to rally off hits to sustain the advance (and even so, I still lost units).  Both Mark and I had to keep making these kinds of decisions: whether it was better to rally off hits, to punch or counterpunch, or to move/and/or maneuver to get into position for a subsequent shot.  This game also brought forward space management. 
    The 1" buffer between units and the straight line moves forced both of us to maintain coherent positions and lines, to think in terms of larger formations and units operating together. It was challenging, but not in a frustrating sort of way.  In other game systems, we would have just jammed as many units as possible onto the hill and from there it would have just been bunches of dice. In this game, we both found ourselves still making tactical moves and adjustments with our units in close combat on the hill. 
    All in all, a pitched battle that took us about 3 hours to conclude: so playable in an afternoon or an evening. In short, the game and battle felt both challenging and "right." We then retired for an excellent repast of grilled steak tips, and I headed home, thinking about the next match!

Excelsior!
 

Related Posts Plugin for WordPress, Blogger...