Wednesday, March 16, 2022

PRUSSIAN CUIRASSIERS 1866 WORK IN PROGRESS II


One week's progress (after horses): left, Cuirassier Regt #7 (Magdeburg); right: Cuirassier Regt #3, East Prussian

As repeat visitors of this blog may recall, my painting rate cannot be described as fast. Neither can it probably be called efficient--which may not necessarily be a bad thing. Who wants "efficient" toy soliders? Blech! But, as usual, I digress (aka, meander): apologies, dear reader.  Back on subject...I'm now one week into the Prussian 1866 Cuirassier project, and as anticipated, nowhere near finished. This despite dedicating several hours per day to painting (did I mention it's good to be early retired?). I am about mid way through painting these 12 figures (well, 24 if one counts horses). Anyway, here is a report on how I'm working through these.  Let's start with the above image.  I spent one entire day on the shabraques--getting the the lines and corners consistent, not only on each figure (parallel lines) but across all figures.  This kind of thing really doesn't leap out at you (nobody picks up a stand and says, "Gee, lookit those lines!"), but I find that a repeated geometric pattern like this has a collective effect, and inconsistencies jump out. 

One way I look at painting is to identify areas of special focus/difficulty where details that I feel need to be brought out will take special attention. Often, this involves identifying areas where there is alot going on in a small space. On the Prussian cuirassier outfit, these involve the base and other openings of of the cuirass, where you have rows of rivets (brass on steel), a black ruffle edged in white sticking out (a very signature look for these fellows), a belt across the midsection, and a confluence of straps and brass hinge straps at the shoulder. 
The Northstar sculpts, which I've commented on before, are quite exquisite. I would call them "photo real" in their accuracy and detail. As such, however, they don't give you much to work with as a painter in the way that less finely sculpted figures might. Others' opinions may differ: it may just be the way I paint that creates the challenge (entirely possible).  In the above picture, you can see the fine details of belt, rivets, and ruffle all near the base of the cuirass: excellent though they are, bringing them out and giving them some separation to the eye took some trial and error (to say the least), particularly the ruffle, which sticks out not much more than 2mm or so (which is about how this detail is depicted in images, to be fair, and so it is on the figures).  Whether anyone else will ever notice these details remains an open question. My thinking is that rendering such things, regardless of how small, still contributes to the overall look of the figure. Some might call this wasted effort given that figures are going to be seen at 4' to 5' distance on the table, or that nobody probably even knows (or cares) that there should be a white edge on a black ruff at the base of the cuirass, or given the state of eyesight in our gaming group nowadays (we're no longer youngsters).  All true: but that's just how I paint at the end of the day, regardless. Like others have said of their painting practice, I'll know it's there, and in the end, I'll feel like the figures are "finished."   
Normally, I paint "assembly-line" style, meaning that I do the same detail or color across all the figures at the same time. However, when confronted with a project that involves lots of what I call "high control" painting--which progresses very slowly--I generally take a few figures and do them to completion ahead of the rest. This project fits into this category. Having a few figs done not only gives me a momentum boost to get me through the project, but also helps me to get the trial and error out of the way so that I have the techniques down for  later figures.
Given their unique qualities, I finished the trumpeters for both regiments...
...and the command set for the Magdeburg Cuirassiers: with these figures, I learned how to deal with the cuirasses. 
Having one command set done, I'm moving on to the East Prussian Cuirassier command set. I may be done with these fellows given another day or two. 
I'll then move on to the troopers for both regiments.  These will move along more quickly than their predecessors and I'll do them in one batch of six (as opposed to the three sets of two that I've done to date).   
Then, of course, I'll do the final touch up, the varnishing, and then the basing. Perhaps I'll be able to bring this project to completion in an even two weeks. And if I don't, well, no matter. It may be three. 

Excelsior!

Wednesday, March 9, 2022

PRUSSIAN CUIRASSIERS, 1866, WORK IN PROGRESS (BARELY)


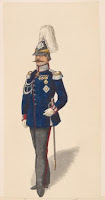
Prussian Cuirassier, Franco Prussian War Era, Edouard Detaille, 1882

Well, dear readers, there's not much new to report on the gaming scene.  I recently ran another game of BBB with KS blocks, but was so engaged with facilitating it that I didn't capture any photos. You can, however, check out a report of the game on Mark's My Brave Fusiliers Blog. I'll eventually update the information on the BBB Resources Page to reflect the tweaks that I did to that scenario.  In the meantime, I thought I'd put up a work in progress post on my current painting. 
Northstar Prussian Cuirassiers and Cuirassier Command 

Not much to look at, really, but these will eventually be two regiments of Prussian Cuirassiers for my Chocolate Box Wars Prussians.  These figs have been primed and sitting about waiting to be done for months (maybe more...I lose track). I finally picked up a brush this week and  tackled the horses (more work than they would seem: undercoated with burnt umber, wash of black, then drybrushed with burnt sienna; then painted the manes/tails black and drybrushed them dark gray; still need to do the harness--which will be leather).   Although I already have two regiments of Prussian Cuirassiers, they are Foundry. They're nice enough, but given that all of my other Prussian Cav are the larger and more detailed Northstar figures, I could not resist "upgrading" my heavies to fit in (chore though they may be). 

As a primary reference, I'll be using Bassett-Powell's excellent Armies of Bismarck's Wars, a "usual suspect" sort of text.  It is a fine reference (don't get me wrong: I highly recommend it), and in my earlier years, given how comprehensive it is on the subject, a text like this would have been the only source I would have used.  However, nowadays I also consult other materials, such as prints, uniform plates, and paintings by artists like Karl Rochling and Eduoard Detaille; these latter may be romanticized, but I would wager that they accurately render uniform and equipment details given that they were produced at a time when those who actually wore the garb and carried the kit were among the primary audience.  I think I really began to appreciate (and use) these other kinds of sources when I was creating forces outside of what the "usual suspect" references addressed. It's not that I don't use Ospreys, etc, any longer, but now I don't rely on them exclusively.  So what began as a necessity has grown into an integral part of my process. If anyone is really interested in going down the rabbit hole of seeing how I incorporate "alternate" references, I would encourage them look over the posts on my Russian Army of the Russo Turkish War era as a good example.

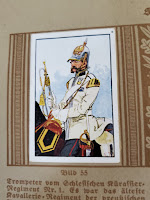
In that spirit, for this project, I am drawing on my collection of Sturm Cigarette Cards. I was fortunate enough to pick up several albums of these on ebay; the bibliophile in me likes them, but they're also useful references (imagine that; a practial curio!).  To use these alternate references, I take digital snaps (or download digital images), paste them in a word document, enlarge them, and bring that to the painting table.  For the curious, here is a pdf version of my Prussian cuirassier cigarette card compilation and my other sources compilation for this project.  And just to round out this post, here are some nice pictures of the relevant cigarette cards (as usual, you may clix pix for BIG PIX):


And that's all for now...
Excelsior!

Tuesday, February 22, 2022

KONIGGRATZ: BLOODY BIG BATTLES GAME REPORT


The end of our Koniggratz game with my recently received Pattern M1861 Austrian Cavalry Saber (Officer's) on the map among the other apparatus. This is the same pattern of saber that was carried by the Austrian cavalry in 1866 (and just made for a nice picture). 

In this post, dear readers, we follow up on our promise (threat?) of taking the next step in gaming Bloody Big Battles at the half scale using Kriegspiel Blocks on maps.  To "stress test" the system, I decided on running a full-up game of the Koniggratz scenario (one of the largest). For those interested in BBB, I've posted all the scenario materials for download on my Bloody Big Battles Resource page.  Although I play at half scale, these materials will work for regular BBB as well (have an eye out for deployment distances, would be the only thing).  On to the report: as usual, you may clix pix for BIG PIX in this report. In this report, I'll cover a bit more on how I managed this game and then on the game itself. 

THE LOGISTICS
I put together the Koniggratz Kriegspiel map at half size. leaving off the bottom row of map sheets.  This configuration fit nicely under two sheets of 27" x 40" plexiglass laid side to side, with the 40" axis running north to south and the 27" axis east/west. In order to provide a base for the maps to lay flat and also to hold the plexiglass, I used four sheets (20" x 30") of corrugated plastic: these worked out well. The map was stable and even could be shifted about a bit. This provided a half scale equivalent to a playing area of a bit over 6 feet by 6 feet. 

I used water based Staedtler Lumocolor pens to highlight some of the contour lines and other terrain features.  These are durable enough to not smudge during play but will clean up easily with Windex afterwards.  

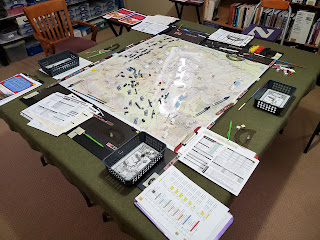
I provide complete details on the apparatus I use to support half scale gaming with KS blocks on my BBB Resources page, so won't reprise all of that  here. There is one addition, however, that I will add. I put inch-scales along the edge of the map under the plexiglass. Players use these to set their dividers to 1"-4" increments in order to "walk off" their moves on the map.  These worked well.  The above picture also provides a good feel for the layout of the map and associated plexiglass, etc.

Above left, I put unit labels in mini acrylic place sign/place holders  (labels are available among the scenario downloads on the BBB Resource Page).  Above right: looking from the Prussian side to the Austrian, the labels are barely visible (more on this  later, though). I stumbled across these nifty little things on ebay and can see many uses for them in other games as well. 

THE GAME
 

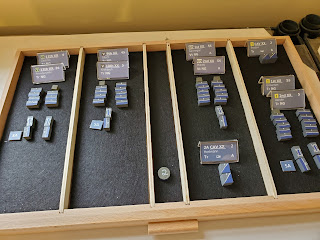
Translation of the BBB Scenario to the KS map. Above left, the Austrian deployment. Above right, the Prussian deployment and arrival schedule. For those not familiar with the battle, the Austrian army (with their Saxon allies) deployed with five army corps in a semi-circle behind the Bistritz river (on the left) bending around to the Elbe (on the right) with a large central reserve of two army corps, two cavalry divisions, and an artillery park behind. Three Prussian armies converged on this position, First Army (from the Northwest), the Elbe Army (from the Southwest), and Second Army (from the Northeast). At the start, only two corps of the Prussian First Army are on the field. This is the classic case of interior lines (Austrians) vs exterior lines (Prussians).  In our game, George and Byron played the Austrians and John M, Earl, and Mike C the Prussians.

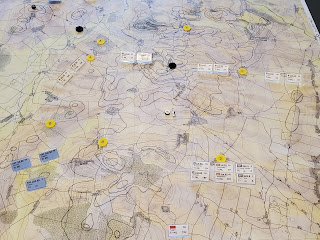
Above: the diagram translated to the game map. Before the game, I placed the unit labels on the map as a handy way to mark the deployment areas for the players. The above shows the Austrian deployment area. George commanded the north (II, V, and III corps) while Byron took the west (Saxons, and the Austrian X and VIII Corps). George also took overall command, allocating the reserve.  The discs on the map are  victory objectives. The Prussians must take five of them to win, four is a draw, and three or less would be an Austrian victory.  The black markers are fixed objectives, while the yellow are variable (they are in lettered pairs, the final location of each to be determined by a die roll--done only after the Austrian deployment). 
The start of the battle from the Prussian side. The starting positions of the four Prussian First Army divisions (yet to be deployed) are marked by the labels.  The stage is set...

...the early stages of the battle: the lead division of the Prussian Elbe Army has marched in (to the south) and the rest of First Army is coming in from the Northwest corner. 

The Prussian Second Army in its tray, still off map and waiting to enter from the Northeast (starting on turn 3).  Mike C, being versed in BBB, graciously accepted this command, helping to facilitate the game until it arrived.  You may notice the "SA" markers in the above. Given that most artillery in this scenario are rifled (RA), to save clutter, only smooth bore artillery are marked (SA); all others are assumed to be RA.

The flow of the battle. Byron, commanding the Austrian left, marched the VIII corps from its position in depth to extend his line and prevent John M (Elbe Army) from getting around the Austrian left. The reserve cavalry divisions were sent his way as well.  In the north, George moved the Austrians up from their initial line the next ridge (much like the Austrians did in the real battle), running into the arriving Prussian Second Army coming down from the North. Earl's Prussian First Army hit elements of X and III Corps in the Austrian center. Objectives are highlighted in the above image (I pulled the markers and drew them on the map once we had diced for them).  
Above: the view of the action in the south, from the Austrian perspective (left) and from the Elbe Army perspective (right).  Most notable event here was John M's Prussian artillery rolling "boxcars" and taking out one of Byron's reserve cavalry divisions in a single shot. Otherwise, things were fairly stable, with the Elbe Army moving methodically towards the strong positions held by the Byron's Saxons and Austrians behind the Bistritz. 

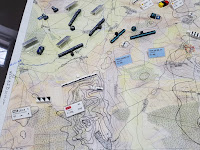
The view from behind the Austrians (left) and the Prussians (right) in the center. Yellow markers are disruptions; red are spent divisions; black are low on ammo. Earl's Prussian First Army went into the assault and heavy action ensued...
...a closeup of the key action in the center. The lead Prussian divisions are disrupted from their assaults, but the Austrian formations have been pushed back from the Holawald sector and  spent.  There are two divisions coming up from behind, so they could probably form another line behind this gap, but the Saxon line to the South could be compromised (at the very least). 

Meanwhile, to the right (and north), the Austrian advance (left), is confronted by the now completely arrived Prussian Second Army (right). On this wing, both players had some activation rolls that hamstrung operations. The jagged advance of the Austrians was caused by some of elements not moving whilst others did. Not to be outdone, Mike C managed to roll so badly that the entire Prussian Guard Corps just sat for one turn. Thus both players essentially lost at least one turn on this wing and units had not gotten into contact yet. 

We had started at 7 pm, and by this time, it was going on 11pm, so we called the game, which progressed more slowly than we had thought it would.  The point of the game, though, was to get a "stress test" with multiplayers on a larger game like this, so a success in that regard.  On that score, probably the biggest lesson learned was the different--closer--focus level when playing on a map as opposed to on a table with minis.  It was much more absorbing; I'm not sure if that would necessarily mean smaller commands per player to compensate--we also recognized that we had not played BBB for awhile, and for many this was only the second time through. By the time we had to call the game, players were starting to get the hang of things and we all agreed that more familiarity with the rules would have meant a faster game--so the lesson might be that the larger the game, the more important fluency with the rules is going to be when playing in this context (as opposed to a conventional mini game where even in larger games players may be able to just walk up and pick up the system).  As far as the feel of the game, the big difference that was appreciated by all was that this style of game provides physical depth to the battlefield that is rarely achieved in a standard mini game, rendering a higher level of grand tactical/strategic level of play: it looks and feels like managing a battle--a Bloody Big Battle (to put it one way). 

One other point brought up was that the unit labels, although useful, tended to clutter up the game.  At full scale using minis on 3d terrain, this would be much less of an issue. However, it detracted more from this game given the half scale and the map.  I pulled the labels and took the above shot as an illustration of the difference between a clean table and one with the markers.  Given that the blocks are generic, there is a need to provide some sort of on table information. More on this as it develops. 

In the meantime, it was a fine way to spend a Friday evening among friends, and a good time was had by all. My thanks to George, Byron, Mike C, John M, and Earl. I'm looking forward putting on the next game!

Excelsior! 

Related Posts Plugin for WordPress, Blogger...