Sunday, December 5, 2021

BLOG HACKED?

 Hello, all,

This is just a quick note to inform readers that I discovered that several of my content pages have apparently been hacked (Dubious Designs, Nine Years War Resources and Scenarios, and Colonial Gaming).  I won't include hyperlinks to them because I don't want to direct anyone to them (they have been replaced by other pages with advertising malware on them--the latter I am informed by my web browser security).

 At this point, I don't know if this is just the start and whether or not this will spread to the rest of my blog.  If so, I'll have to just shut the blog down (I don't have the energy to start over or redo what's lost).  

I hope that won't be the case, but if so, I just wanted to get in a post to explain and to say thanks to everyone who has been part of this experience.

Best,

Ed M

Friday, December 3, 2021

PASS IN REVIEW: RUSSIAN RTW ARMY

Russian Army of the Russo Turkish War Era on Parade
 
Once again, life has intruded on art, as reflected in the absence of blogging activity here (only one post in November!). Hoping to get back into a more regular pattern again, here is the overdue parade of my completed Russian Army.  This post represents closure on this major project, which began in April, and as such also marks the moment to move forward again into other subject matter.  But enough of these meta-ruminations. On to the parade. In this study, you will find links to the collective posts that made up this project (and as usual, you may clix pix for BIG PIX for the eye candy):
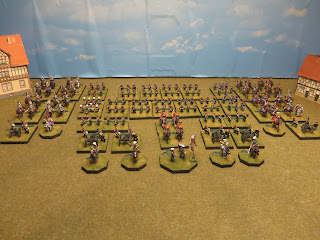
The entire force as seen from the Tsar's raised viewing platform (cue appropriate Imperial Russian martial music ). The artillery park and command take pride of place at the head of the formation.
Looking over the head of the Guard Cossacks, the serried ranks of the regular Infantry contingent, the backbone of any Russian Army: nine line battalions plus two rifle battalions.  
The Russian Guard and Bulgarian Legion enhance the infantry.
Two battalions of blue-jacketed dismounted cossacks provide auxilliary infantry support.
Two cavalry divisions, each consisting of a hussar, an uhlan, a dragoon, and a cossack regiment, plus horse artillery, march on the wings.  The top-pictured cavalry division is led by the cossack general, a conversion and the first figure completed in the project.
For anyone who might be keeping track, this is a much larger set of figures than would be needed for the Chocolate Box Wars project (still a work in progress: the less said about that the better...).  As a matter of fact, this collection violates the entire principle of that small figure count project--except for the truism that there really is no such thing as having "too many" figures. This force does, however, provide a good size for my 19th Century Volley and Bayonet Variant, which I also had in mind.  In the end, I must say that this project grew in the doing, in no small part because of the immersion in research that each stage involved (sort of like Tolkien's description of how his tale started as a philological exercise and then "grew in the telling").  At any rate, the project is now ready for the table, and I hope that my record of its production in this blog has provided some useful information for others who may be interested in the period--and if not, at least a diversion for those who may just like to look at pictures of toy soldiers. I would count either as a success.
 
Excelsior!
 

Tuesday, October 26, 2021

PIKEMAN'S LAMENT: SCOTS V CONTINENTALS

The view looking over the shoulder of the Meanderer's alter ego on the table towards Mark D's Scots.
 
Although blogging activity has been slowed recently due to a variety of causes, gaming activity has been going on (I am happy to report).  In this post, we return to the gaming table with a game report of another tilt with Pikeman's Lament. My friend Mark D, of Mark D's Gaming Site Fame, wanted to get his newly minted Scottish force on the table as well as having more practice with PL.  We reprised the scenario from the last game for this one, only this time around I would be taking a side as opposed to facilitating the game (as usual, you may clix pix for BIG PIX in this report)...
The "War Desert" layout, with two forces coming from opposite sides and encountering each other while making for a bridge crossing. For this game, we followed the "GA PA" scenario in the book, which is basically a "tournament" style game (whack away at each other until there are only five units left on the table, total, and then tot up the points to see who came out ahead). 
Mark D's Scots
My Continentals
 
I came up with the original force mix to familiarize AJ and Mark D with the rules, having one each of the most common unit types on each side (and representing the most common range of special abilities).  I realized that at 22 points, this original force mix was, by coincidence, within spitting distance of  the "standard" 24 point force.  I wound up being the "attacker" and Mark the Defender (in this scenario, this only defines the order that units are set on the table and the order of movement: attacker first).  For this game, we added a special character to each side (1 point), bringing this game up to 23 points per side.  The special character gives the unit he is with a +1 to morale.  I put mine with my dragoons given that their morale was the lowest and intending that they would be operating outside of the range of my commander (commanders give a +1 to the morale of units within 12"). Mark D's agitator (his priest) beefed up his already stout pikes: a tough nut!  Given that Mark brought Scots to the table, I figured that I would just call my side "continentals" in order to add color: and we would assume that this fight was happening somewhere in Germany at some time in that wide open period known as the Thirty Years War (in other words, units in any force could have been recruited from just about any nationality...and you'll see more on this if you read on...).
 
Canny Scot Commander Mark D surveys the field as his lads get themselves fired up for battle. It would be appropriate to invoke Robbie Burns to provide the preamble to this game: "the best laid schemes o' mice an' men aft gang a-gley"
The Scottish Shot Advance Over the Hill and Far Away... (sorry, couldn't help m'self)
On the right, I push my French Gallopers, and English Commanded Shot and Dragoons forward, and Mark responds by bringing his Dragoons around the edge.
On the left, my German Pikers and Trotters move ahead, matched by Mark's Pikers, Commanded Shot, and his Gallopers and Trotters. 

Mark's Dragoons win the race and take up a strong position in the Orchard out on my right (curses!).
An extended and uneven shooting match will ensue between my commanded shot and dragoons in the open and his fellows under cover! But more on this later. Meanwhile...
...out on my left, the German Pikers close ranks and continue to marsch!
In a "telling maneuver" I swing my Aggressive French Gallopers from their position on the right towards the center, and Mark counters with his Trotters: things are about to get interesting! (In the background, the Scottish Shot has taken up a strong position in the ruins).
Unfortunately, French elan is no match for Scottish stubborness this day, and--in full view of the (not amused) German Trotters--the survivors of the French Gallopers bounce back to where they started...
...and the Scottish Musketeers in the ruins that I mentioned a bit earlier now have something to do (much to the French Gallopers' regret!).
...returning to the right, the English Dragoons take desperate action and charge into melee with the Scottish Dragoons, beating the odds and taking the position, very unlike their comrades the (now late) French Gallopers...
...meanwhile, the (now) single figure Scottish Trotter "unit" that saw off the French Gallopers will live a charmed existence and gum up the center of the table for the next three or four turns! The German Pikers advance, baiting the Scottish Aggressive Gallopers into charging (who no doubt were feeling all the more aggressive having seen their Trotters see off the French Gallopers)...
...the clash: Close Order Pike Defending vs Attacking Gallopers: Strength on Strength...
...both take their lumps, and both pass morale, but the advantage goes to Close Order Pikers in this case, and the Scottish Gallopers bounce back. Now at half strength, the Gallopers will nevertheless charge again in their next turn.  Meanwhile, the German Trotters decide that they've had enough of their pesky Scottish Counterparts...
..the
Scottish Gallopers tangle with the German Pikers yet again and the Scottish Trotters are no more ...
...the Scottish Gallopers wipe themselves out, but they take the German Pikers with them (who had been so reduced that they were rolling at a minus 6 and came out with less than zero for morale, routing). In the right foreground, the half strength English Commanded Shot are about to recover from waver and enter the fray and get unceremoniously shot down in the next turn by the Scottish Shot.
With the demise of all of the opposing units that had been in close proximity to one another,  a momentary pause descends on the battlefield. On the Continental side, everything now falls on the unflappable German Trotters, who gaze across the field at the opposition...
...with the support of some distracting fire from the shot, and some key activation failures on the part of the Scottish Musketeers, the German Trotters manage to advance across the table unscathed and deliver several shot attacks against the Scottish Pikers (there were several Caracole activations that did not result in follow up charges, but did allow the Trotters to deliver fire, which over time chipped away at the Pike)...
...and then it happened: despite the Agitator's bonus and the Commander's help, Mark rolled snake eyes for morale and the Scottish Pikers routed away. This brought the game to a close.  With the Scottish having lost a Pike, a Trotter, and a Galloper, and the Continentals a Pike, a Galloper, and a Commanded Shot, the score wound up being 12 points for the Continentals and 10 for the Scots--a slim edge to the Continentals that matched the feel of the game!

Regardless of points, it was a fine day out with toy soldiers on a sunshine-striped table. Thanks to Mark for the good company and for bringing out his Scots (who will be back to fight another day, no doubt!). 

Excelsior! 


Related Posts Plugin for WordPress, Blogger...